How to develop new mobile applications
Less than to read
The Extensibility Framework allows you to build new pages accessible through the Sage X3 /handheld URL.
You can access the new pages through additional menu items added to the menu pages.
Technical prerequisites
You need Sage X3 Services Developer Studio. You can find more information on how to install the Developer Studio here.
Reminder
- Unzip the latest Developer Studio.
- Setup your Sage X3 connection in the xtrem-config.yml configuration file.
- In VSCode, run the nvm list command to check the nvm version currently in use.
- Check the .nvmrc file for the npm version compatible with the latest Developer Studio
- If necessary, install the version of node.js supported by the latest Developer Studio as indicated in the .nvmrc file.
- In VSCode, run nvm install x.x.x and nvm use x.x.x to use the new installed version of node.js where x.x.x indicates the version indicated in the .nvmrc file.
- Install the Developer Studio by running the following command: npm run clean:install:win.
1. Setup your Sage X3 metadata
To develop new applications, take into account the Application documentation to create packages, nodes and operations in X3.
Sample Application
A showcase walks you through the development of a custom entity and corresponding pages to classify Project time entry elements that will be published through the /handheld URL.
Additional comments regarding the showcase
- The showcase is based on a fully custom node called TimeClassification.
- The package owner is a fictitious organization called ShowCase.
- TypeScript UI pages are developed to create and update TimeClassification records using the new interface.
To get sample applications, install this showcase in your Sage X3 application. The showcase is located inside a .zip file. Extract src_x3ShowcasePatch_2024_R2.zip to install the showcase.
Note: To install this showcase, some components are required as prerequisites:
- Sage X3 Services Developer Studio: Minimum version 48.0.53
- Sage X3 Application Update: Minimum version 2024 R2 12.0.36
After the installation of the Sage X3 patch, the following metadata are created for the showcase:
- New table: XPJMTEC and its associated data model API_XPJMTEC.
- Include a set of different type of fields, such as texts, references, checkboxes, enums (local menus), dates, and glossaries.
- Includes a collection: a linked table XPJMTECAUS to manage time classification assessors.
- A new Package, custom-1 with the owner Showcase.
- Associated to the XPJC activity code.
- Three associations operations in the API operation function (GESAPIOPE):
- A custom mutation XPJM_TCL_CUSTOM using a custom Sage X3 Subprogram APIOPE_PJMTEC returning a message.
- A CRUD mutation:
- XPJM_TCL_UPDATE, using a new custom Sage X3 window OXPJMTEC located in Development > Windows > Script dictionary. This is used to create or update the TimeClassification records using the standard CRUD actions.
- Important: Validating the new XPJM_TCL_UPDATE operation in the API operation function (GESAPIOPE) after applying the patch is mandatory for the CRUD mutation to work.
Additional reminders for collections
- Define collections as Mutable in the Data models function if you expect them to be sent in the payload.
- For example, the XPJMTECAUS collection is defined as a mutable collection in the XPJMTEC data model.
2. Generate your packages in Sage X3 Builder Developer Studio with VSCode
Once the Sage X3 metadata is patched and the nodes are revalidated in your Sage X3 folder:
- Run the npm run generate command in VSCode to generate or refresh your custom TypeScript packages.
- Optionally, you can either:
- Run the npm run generate package my-package command to generate a single package.
- Run the npm run generate -- --scopes "@my-company1,@my-company2" command from the root folder to generate the packages associated to owners such as my-company1 and my-company2.
These commands need to be run from the root folder of the Developer Studio.
Note: Sage standard packages are not regenerated when the generate command is executed by partners. To be properly generated in VSCode, all the specific tables, nodes or properties, specific operations, etc., must be linked to the specific packages in the Sage X3 metadata setup.
Reminder
Once generated, make sure nodes and properties are properly created by querying your nodes:
- In VSCode, build your specific packages and specify the dependent imported packages by executing the npm run build command in the package folder.
- Then, start a service by running the npm run start command in the package folder.
- Test your queries using the following explorer: http://localhost:8240/explorer/.
- Mutations can also be tested using the explorer.
- Replace localhost with an IP if needed, according to your installation.
3. Develop your pages
The Developer Studio provides you access to the entire Sage X3 standard UI component libraries and to a large set of standard UI functions to ease the development of pages. With these functions, you ensure your pages are developed according to Sage standards.
Before you start to develop pages, keep this in mind:
- Keep your pages light
- It is highly recommended to develop the business rules on the server side (X3) mapped to your nodes instead of implementing the business rules on the client side (page).
- You can develop business rules on the server side to keep your pages light with computed properties and custom operations.
- If possible, keep your pages non transient
- Avoid the development of transient pages where data is loaded using a GraphQL query onboarded on the page.
- It is recommended to develop your pages mapped to nodes.
- By developing your page mapped to a node, it can inherit any new properties added to the node and there is no need to modify the query.
- The management of node extensions and page extensions will be facilitated on non-transient pages.
Sample Application
Use the following pages as an example to illustrate the development of a page.
To start, download the pack.
Unzip this pack in the application\custom-1\lib directory located in the Developer Studio install directory after you have generated the custom-1 package. This pack contains pages, menu items, client functions and the index. script for the showcase application.
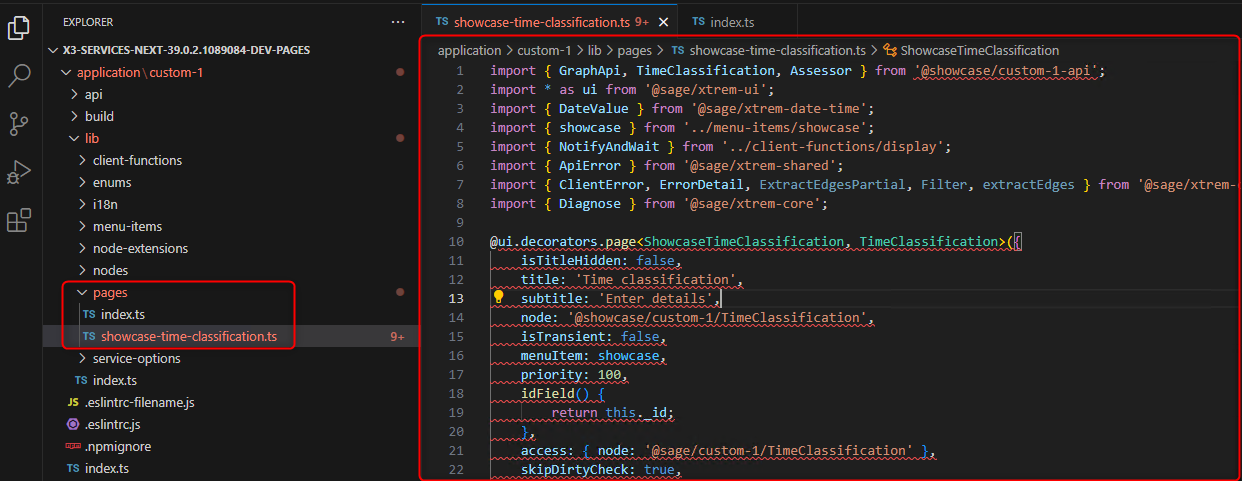
- The page showcase-time-classification.ts is an introduction to the following UI developments:
- Providing some guidelines to respect the Sage standard.
- Introducing best practices.
- Containing some samples and common UI components, such as lists, detail panels, page actions, containers, dialogs, etc.
- Contaning regular CRUD actions and custom actions.
- A single page is required to manage the sample application Time classification:
- Benefits:
- The navigation is fully managed by the framework, from the list to the details, including the CRUD actions.
- The UI is responsive and will be adjusted to mobile screens.
- The following page samples are also included in the showcase:
- showcase-time-classification-pods.ts introducing pods components.
- showcase-time-classification-tabs-pods.ts introducing tabs components.
- showcase-time-classification-wizard.ts introducing the creation wizard component.
- showcase-project-management.ts introducing the nested grid component.
- mobile-time-entry-inquiry-by-date-extension.ts introducing a custom page extension added to a standard page.
To develop a page:
- Create a .ts file inside the pages folder of your package.
- The showcase-time-classification.ts page below can be used as an example:
- Create the index.ts file to reference your page inside the pages folder of your package.
- The index.ts file for the showcase-time-classification.ts page:

UI components used on the showcase page
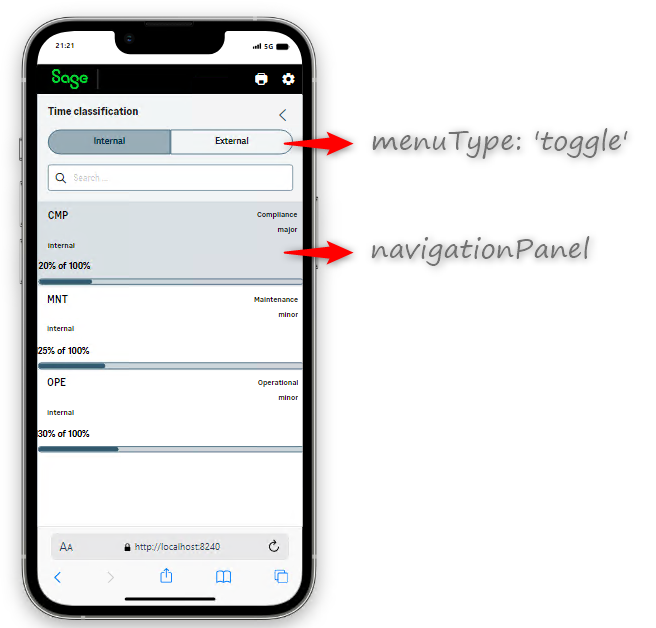
- Navigation panel
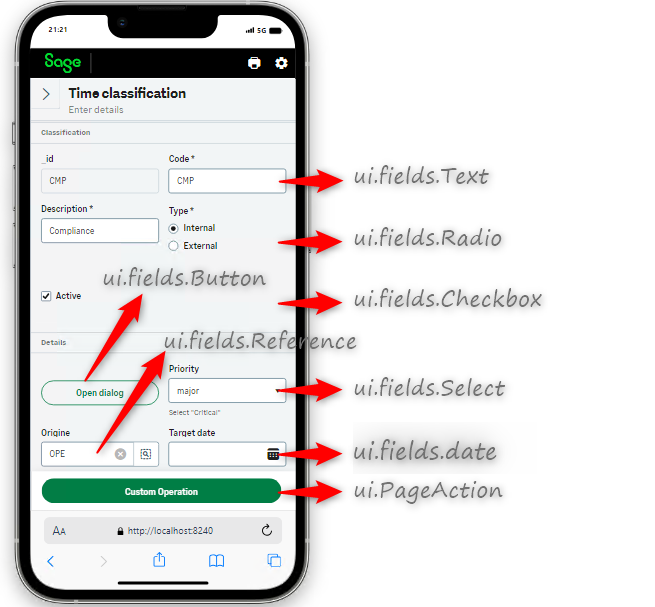
- Detail panels
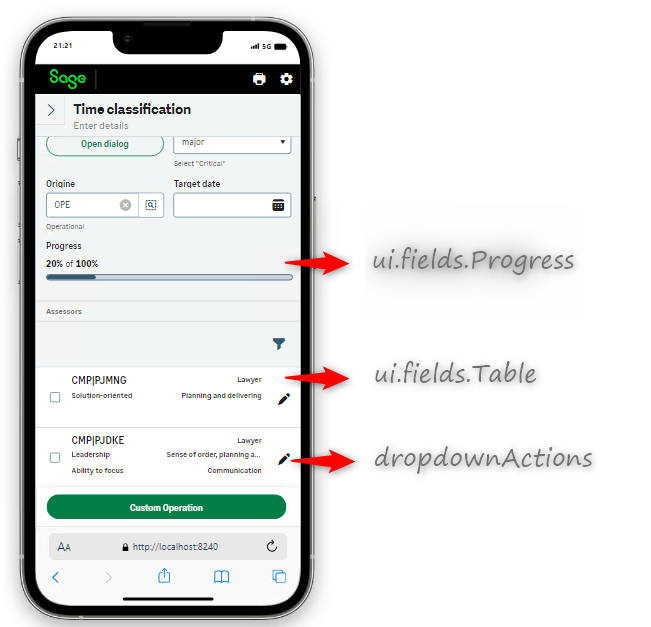
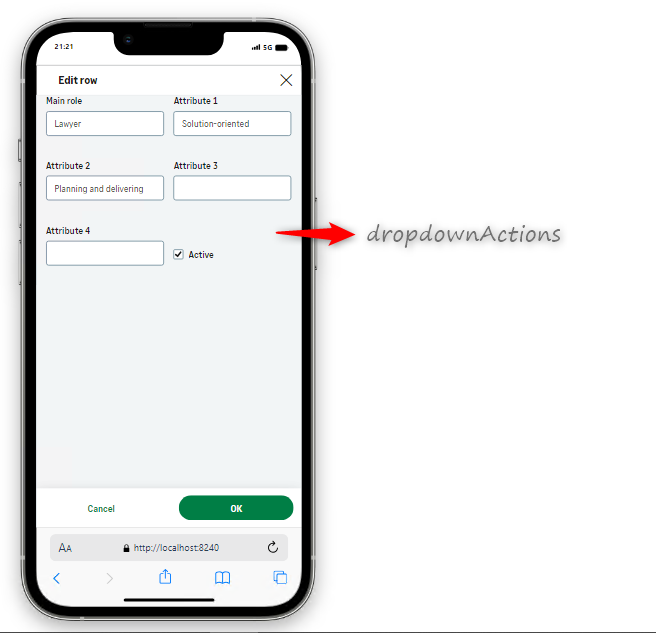
- CRUD actions
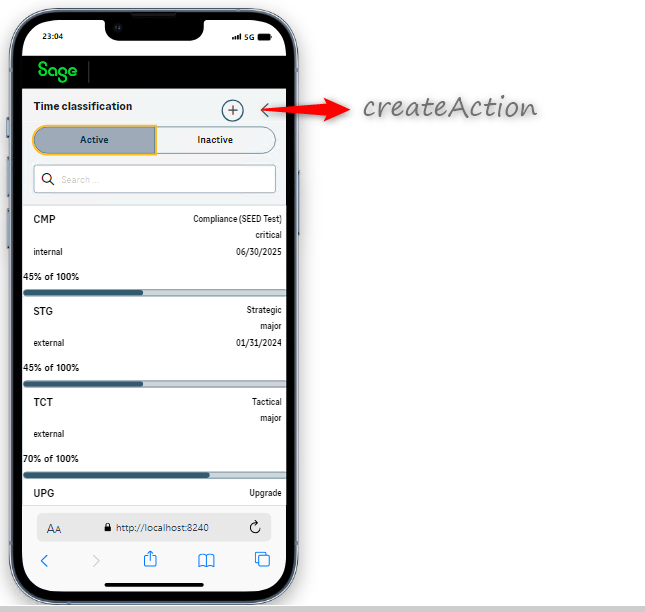
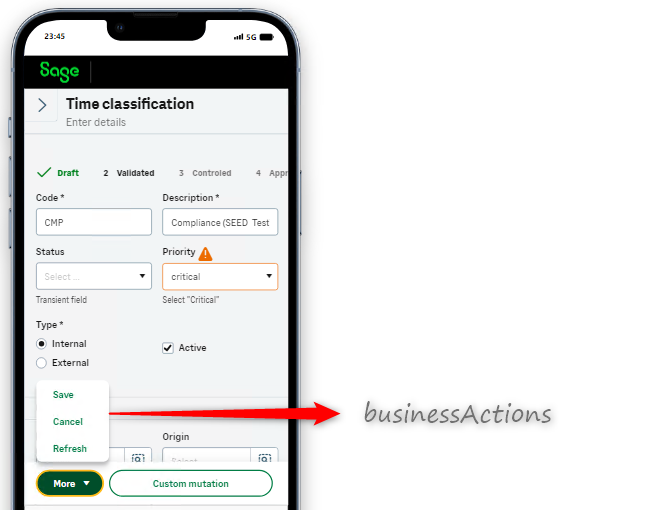
4. Link your pages as mobile applications on the Sage X3 handheld version
To create menu items:
- Create a menu-items folder inside the lib folder.
- Create the .ts file for your menu item inside the menu-items folder.
- The showcase.ts menu that can be used as an example:
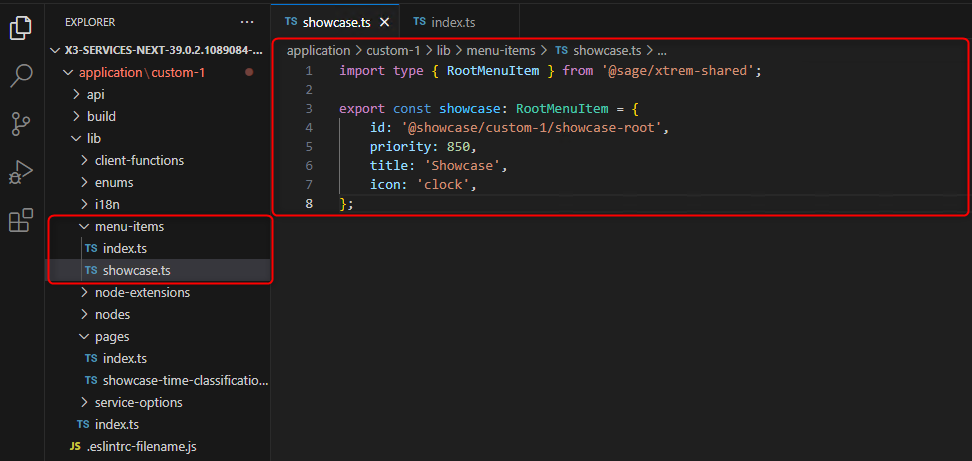
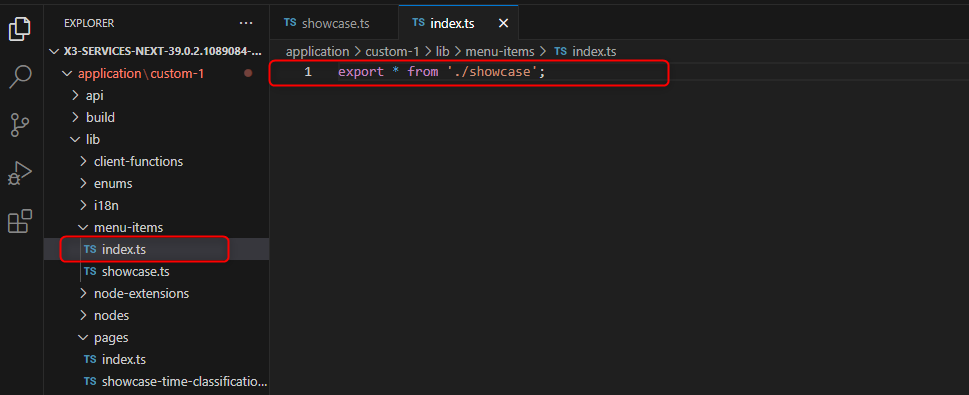
- Create the index.ts file to reference your menu item inside the menu-items folder. Make sure you export it.
- The index.ts file for the showcase.ts menu item:
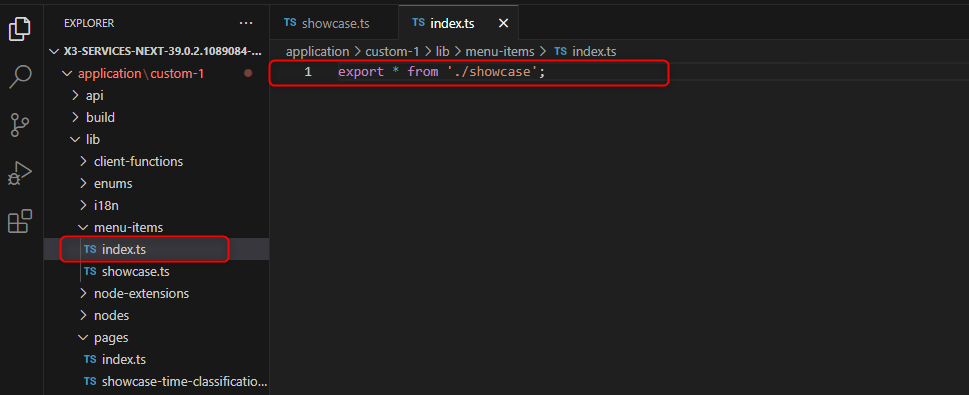
- Update the index.ts file inside the lib folder to reference the menu-items folder.
- Link the page to the menu item by importing it.
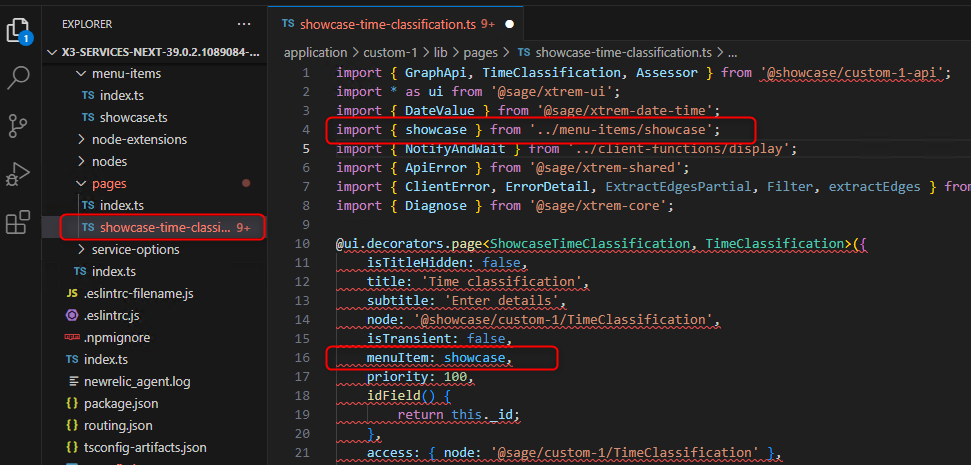
A page can be linked to several existing menu-items.
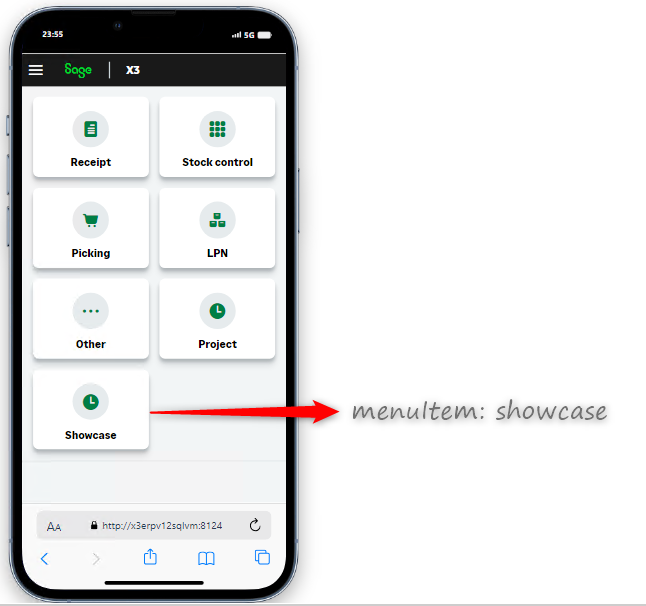
The new pages will be available on the navigation page on Sage X3 handheld (/handheld URL).
Follow the documentation on how to deploy your mobile applications or your customized nodes
- X3 handheld
5. Test the new pages
Note: Before running the npm run start command in VSCode, check if Sage X3 Services is running on the same machine and listening on the same port. If it’s running, don’t forget to stop Sage X3 Services on the Windows Services list to avoid conflicts. Optionally, you can setup different port numbers in VSCode and in Sage X3 Services to avoid conflicts.
- Build your packages by executing the npm run build command from the package folder.
- Start the service by executing the npm run start command from the package folder.
- Test your page in the following URL: http://localhost:8240/.
