Setup of the Sage 200 Native API - using Microsoft Azure Active Directory Tunnelling
Less than to read
- Onboarding with Microsoft 365 (video)
- Setup the Sage 200 Native API - using Microsoft Azure Active Directory Tunnelling (video)
- Prerequisites for using the Sage 200 Native API
- Connect Sage 200 to your Microsoft 365 account
- To set up the Native API
- Set up user email addresses in Sage 200
- To test the API has been successfully configured
If you already use the 200 API via Sage ID and an externally facing web server, before following these steps access System Administration, choose the option for API, choose edit and untick the option for Enable API. This will turn off access via the previous method and allow you to follow the next steps.
Due to TLS/ Sage ID changes here, the Azure Active Directory Tunnelling method is supported in Sage 200 Professional Summer 2018 Remastered, 2020 R1 and above.
If you are looking to set up the Native API Tunnel with the same Office 365 tenant as used in a test environment, please follow the steps in this article to successfully move the Native API. You may come back here when you wish to reinstall the App Proxy Installer.
Onboarding with Microsoft 365 (video)
Prior to setting up the API, you must ensure you have carried out the required steps to onboard with Microsoft 365. You can read about this in the following Sage Knowledgebase guide or watch a video guide below.
Setup the Sage 200 Native API - using Microsoft Azure Active Directory Tunnelling (video)
The following video details the steps covered in this guide. We’d recommend watching the video first, and follow the steps in the guide below as you perform the set up.
Prerequisites for using the Sage 200 Native API
Before setting up the Sage 200 Native API, you must first ensure you have a supported Microsoft 365 licence. This guide, will take you through what is supported and how to check you have the right license before contacting us.
If you have purchased an Microsoft 365 license from Sage, you will have received a “getting started” email. To onboard this license, follow the steps in the email.
To add an existing Microsoft 365 license to your Sage registration Confirm through this guide you have the supported license Email Business Partner Sales via [email protected] and ask for an existing Microsoft 365 registration to be added to your customers account. You will also need to the Sage 200 API registration is enabled on your license
Once you have accepted the Microsoft agreement and the Sage Business Centre application permissions, you will be taken to the Sage Business Centre. This will indicate that the on boarding has been successful and you can now continue to install the Sage 200 Native API application.
Some activities involving Azure Active Directory can only be performed by users who have Global Administrator rights. Please refer to this article from Microsoft for further details about what is required.
Connect Sage 200 to your Microsoft 365 account
Now you have activated your Microsoft 365 license and registered it with Sage, you will now need to install the Microsoft Azure Active Directory Proxy Connector on your Sage 200 server.
This connects your Sage 200 server to the Azure Active Directory where authentication is done to allow you to “tunnel” in and out of your network securely.
The Microsoft Azure Active Directory Proxy Connector requires Microsoft Windows 8.1, Windows Server 2012 R2, or later versions of Windows.
Installation Steps
- Download the Azure Application Proxy Installer:
- For 2024 R1 and above, download the 2024 R1 version.
- For 2023 R2 or below, download the 2023 version.
- Extract the contents of the downloaded zip file.
- Run the
AppProxyInstaller.exe. -
Select Install and Configure.

-
This starts the Microsoft Azure Active Directory Proxy Connector installer. Click Install.
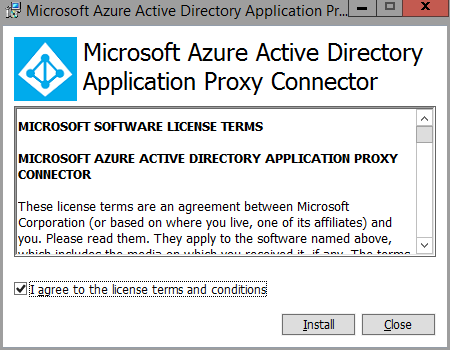
- You will be asked to sign into your Microsoft Azure account.
- Click Close when the Microsoft Azure Active Directory Proxy Connector setup is complete.
- You will be asked to sign into your Microsoft Azure account again.
- The installer will now populate with information for you to create your enterprise applications within Azure Active Directory.
To set up the Native API
- Go to https://aad.portal.azure.com and sign in with your email address you’ve used in the installation.
- Select Enterprise applications.
- Select New application.
- Select On-premises application.
- Enter the details for the on-premises application.
- Copy and paste the Native Name to the Name Field and Native Internal URL to the Internal URL field from the Microsoft Azure Active Directory Proxy Connector installer
- Set Pre Authentication to Passthrough.
- Click Add to create the application.
- Once this has completed, you’ll see an overview of the application you have just created.
TIP: If you have gone through this process with an email address which is not admin@***.onmicrosoft.com, the API will not be automatically enabled. In System Administration on the API tab, the status will be set to PendingAuthorisation.
In this instance your Business Partner will have to contact Technical Support to enable your API registration with the following information:
- The site name
- The site URL
- The email address used during the setup
If you have issues finding any of these, contact Sage 200 technical support first. (Both site name and site url can be found in Sage System Administration on the API tab.)
Once this has been enabled, you will receive an email confirming this has been done, and you can proceed to the next step.
If you need to set up the connection with a different administrator account, use Reconfigure to change the Microsoft 365 account the application is associated with.
Set up user email addresses in Sage 200
To give a user access to the Sage 200 API they will require a valid Sage ID. The currently logged in user will also have Azure AD ticked and the Azure ID entered automatically in the API tab in System Administration.
- Open: System Administration.
- Select the Users list.
- Right-click the user and select Properties.
- Select the API tab.
- Enable Sage ID and enter the user’s Sage ID email address (this is to be used to authenticate with when using the API).
- Ensure the Sage ID created in step 4 can login successfully to the my.sage.co.uk web page - ensuring the MySage terms and conditions have been accepted before proceeding
To test the API has been successfully configured
Once you’ve set the API up and installed the Native API proxy installer you can test to see whether the API successfully returns any information.
We have an API Test tool for you to use to confirm whether you can successfully return sites. The download and instructions can now be found in this article.
Now that the API is enabled successfully, you may wish to look at further documentation: