Transaction import v1 workflow
Less than to read
Assumptions
For v1 transaction import, the following scenarios are based on the assumption the products will send the querystring parameters as stated in the integration document.
Contents
- Scenario 1 Successful file upload (CSV file with debit and credit amounts)
- Scenario 2 Successful file upload (CSV file with dDebit and credit amounts - overlapping dates)
- Scenario 3 Successful file upload (CSV file with only debit amounts)
- Scenario 4 Successful file upload (CSV file with debit amounts - flip signs → debit to credit)
- Scenario 5 Successful file upload (CSV file with credit amounts - flip signs → credit to debit)
- Scenario 6 Cancel file import
Scenario 1
Successful file upload (CSV file with debit and credit amounts)
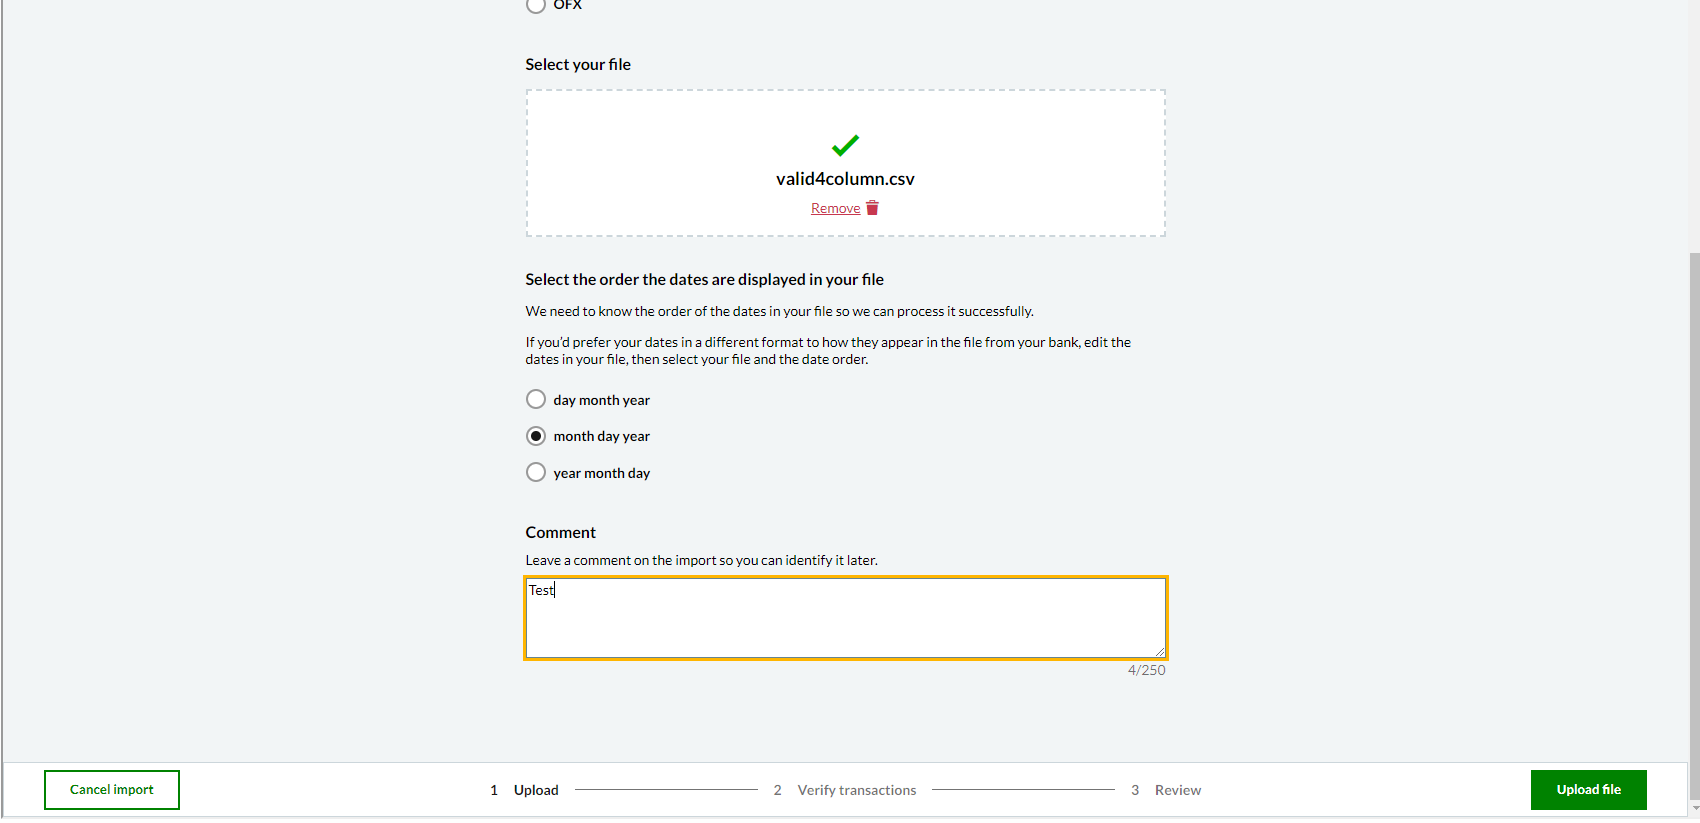
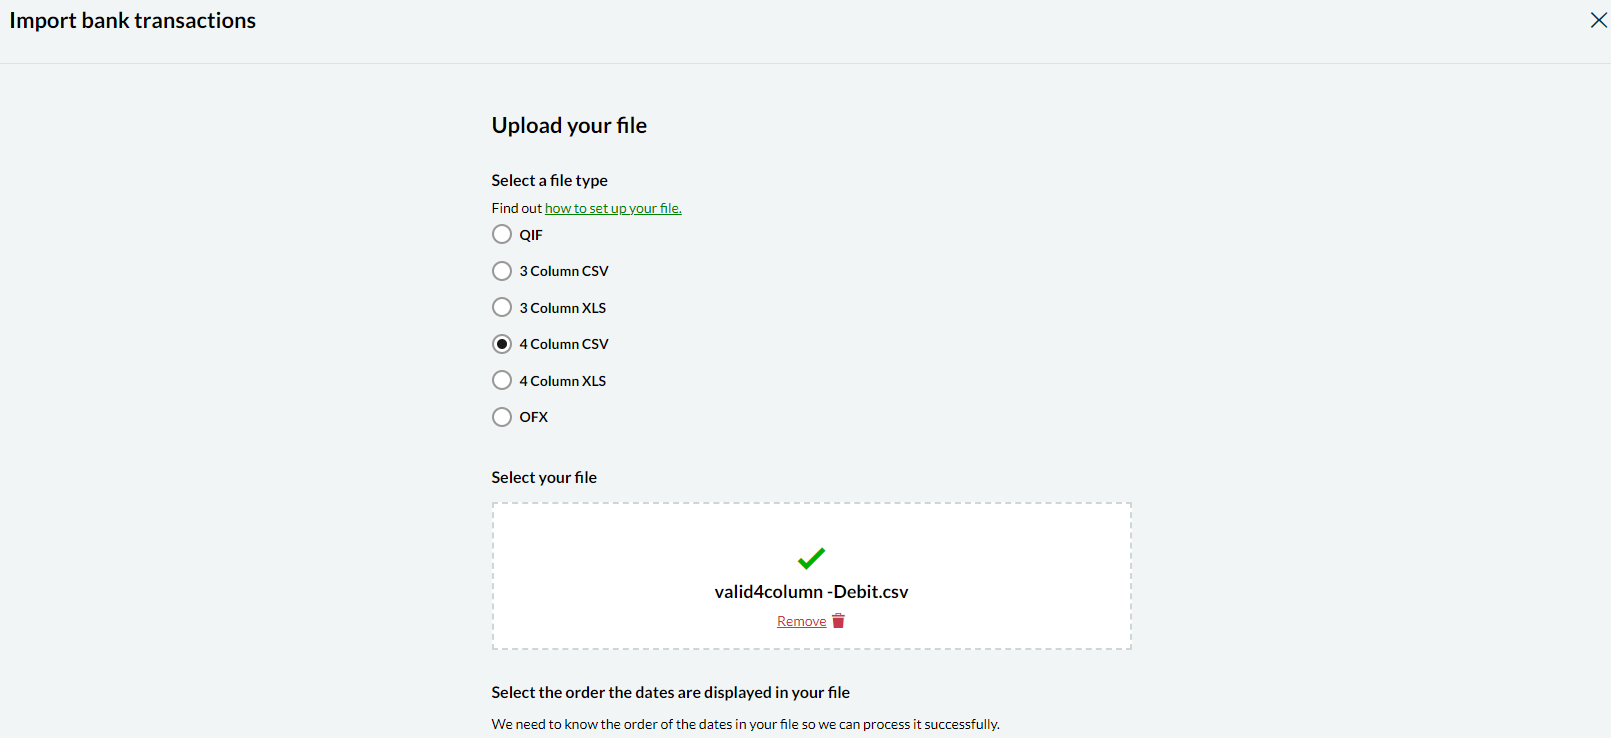
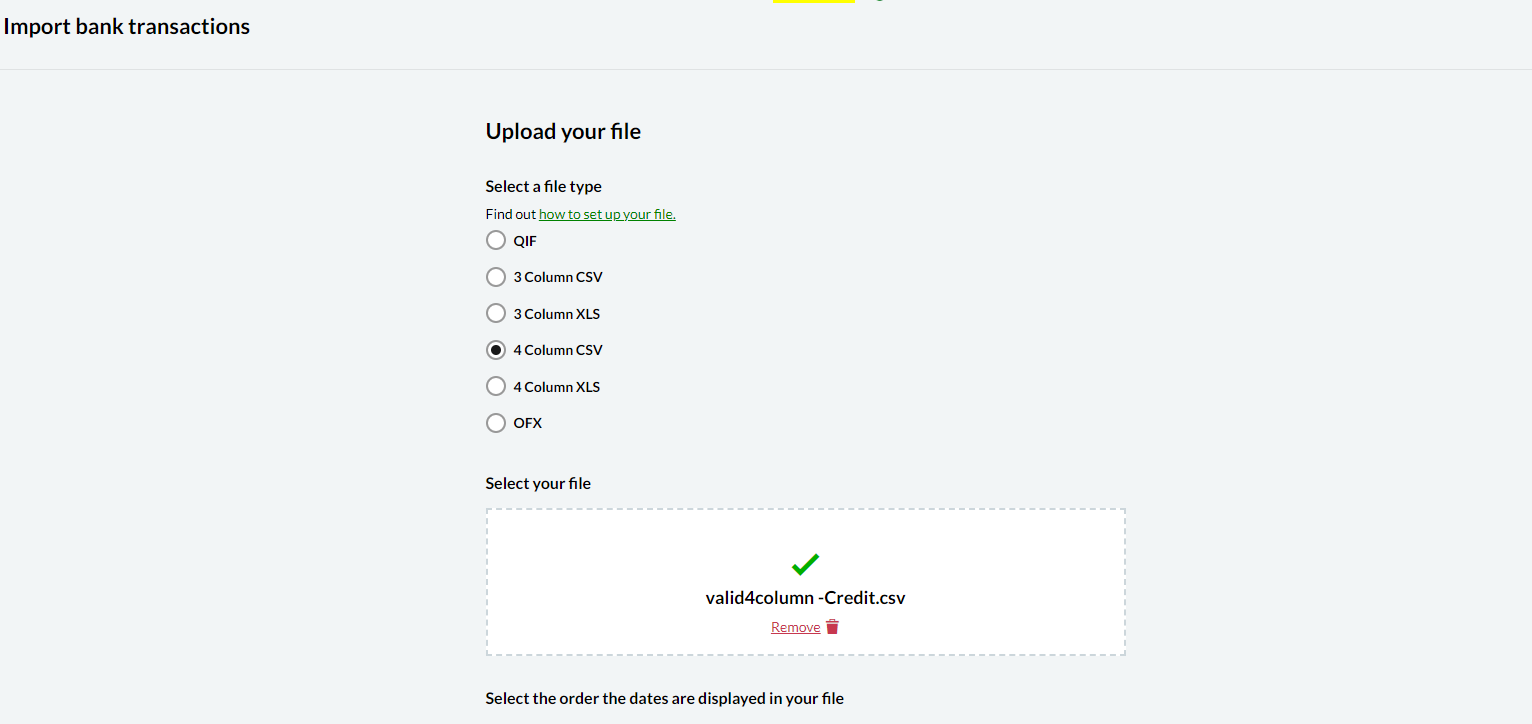
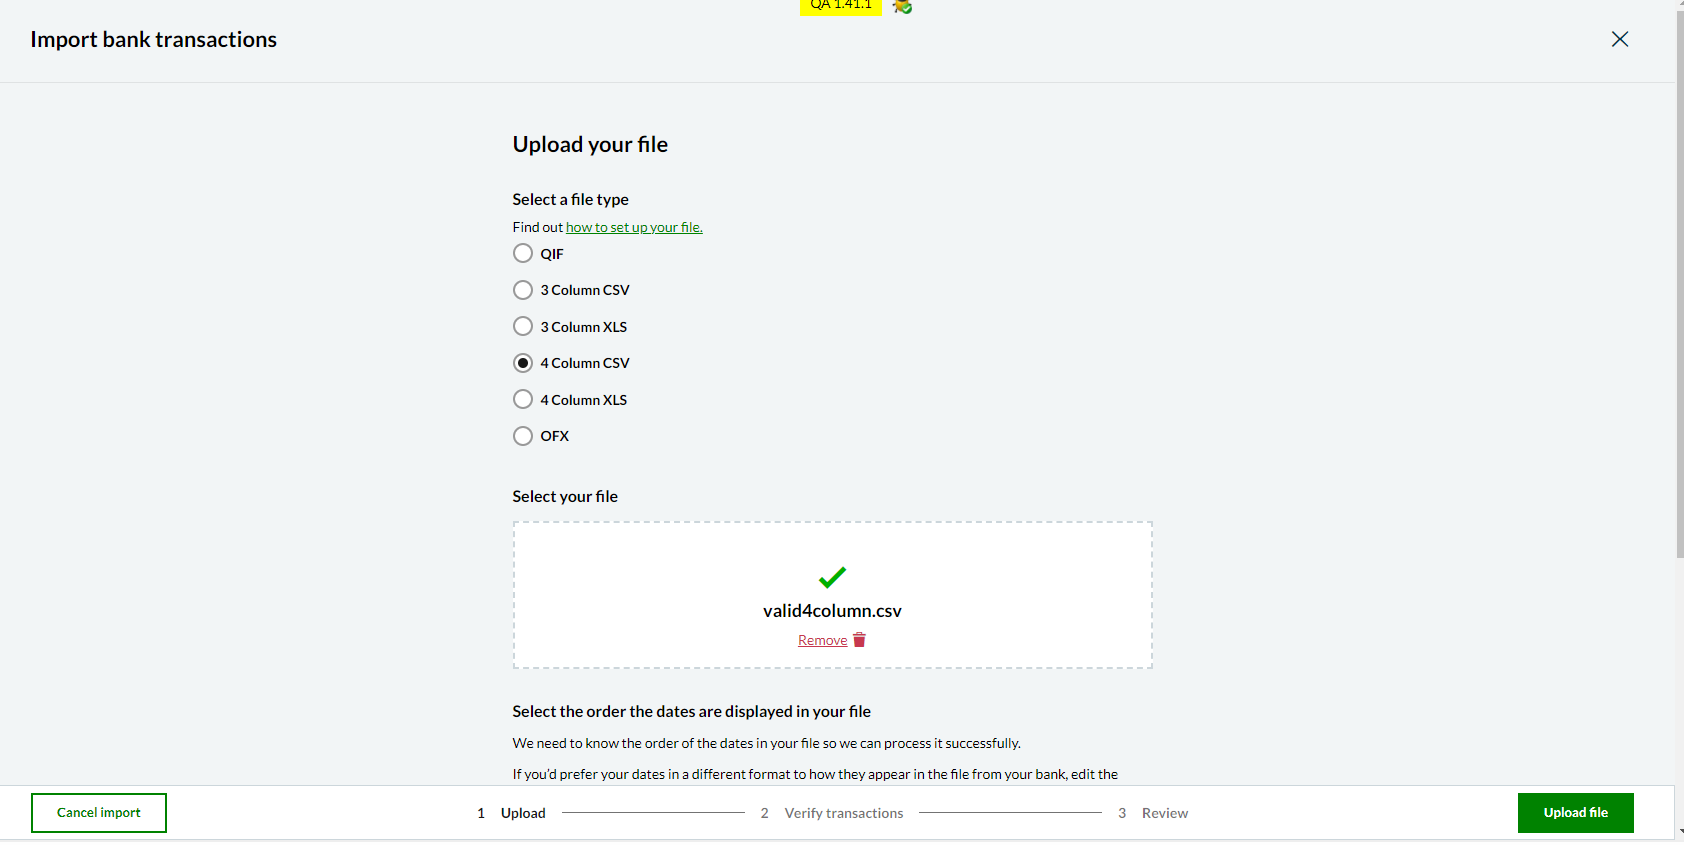
- Select file type (required).
-
Select the file that will be used for import (required).

- Select the order of dates displayed in the file uploaded in previous step (required).
-
Add comments (required). The regex used to validate special characters that are not allowed is:
/(?=.*^[\w])(?!.*[÷$%^&*()_+|~={}[\]:;<>@#\r\n])/ - Upload file button will be enabled only when all the selections and conditions are met.
-
Click on Upload file.

-
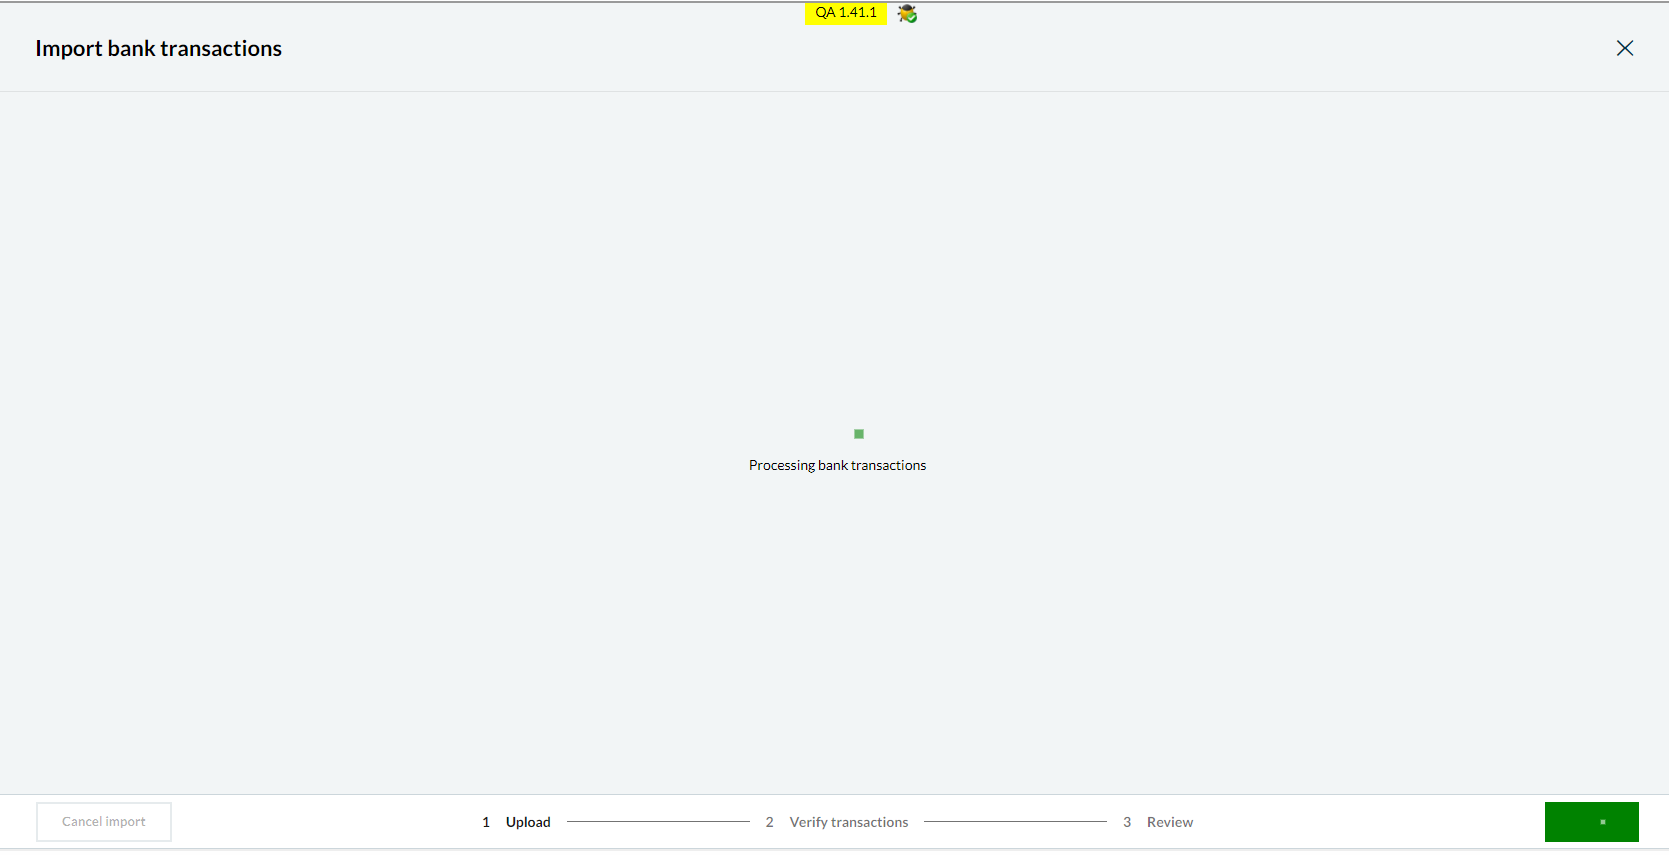
System will now upload the file and backend APIs will validate the file content. If there are any errors or issues with file or selected options (like file type or date format), the appropriate error will be shown to the user.

-
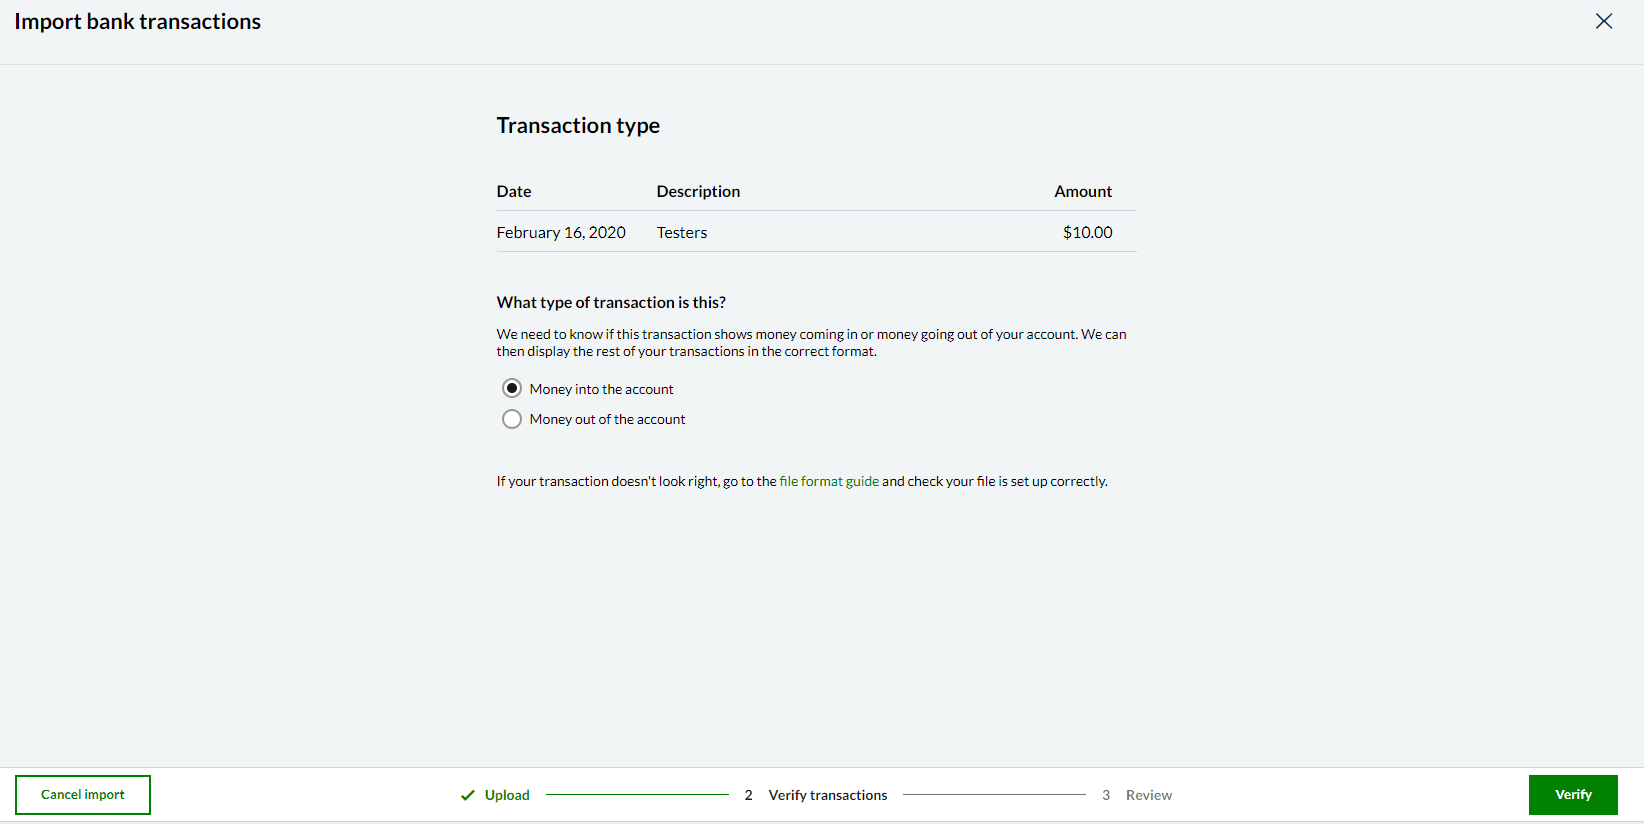
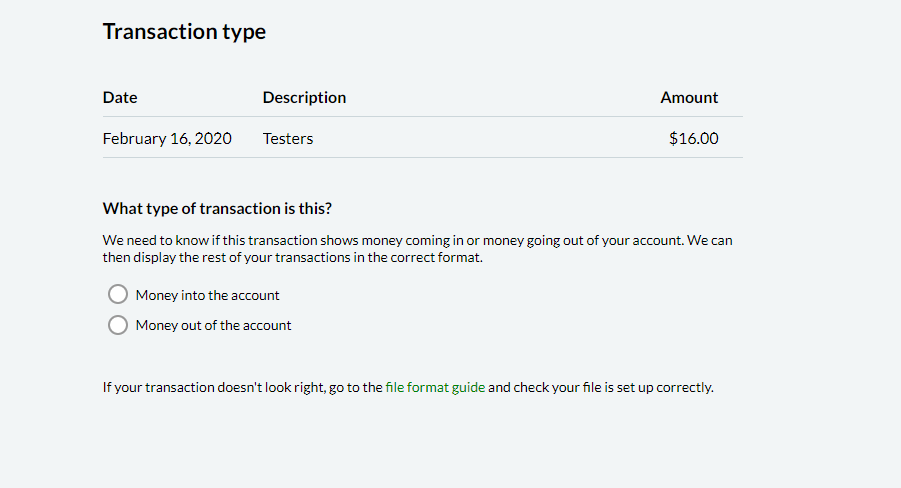
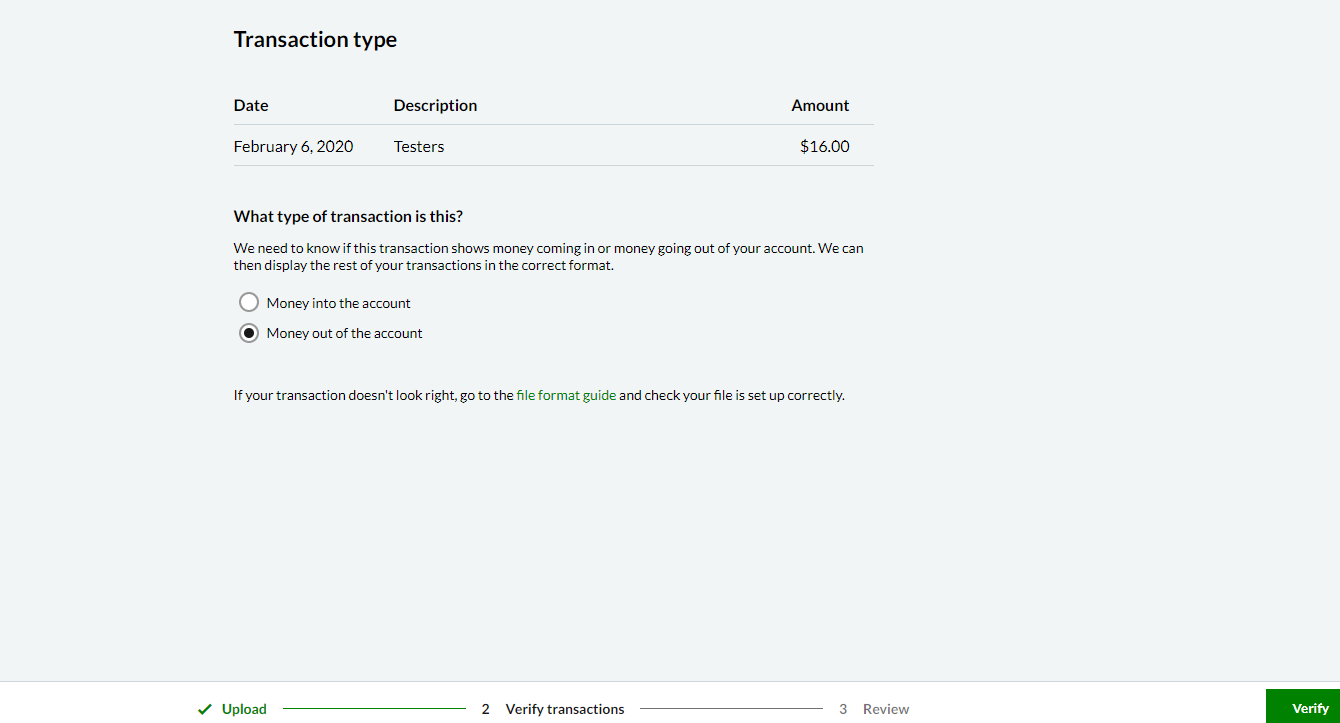
After the file is uploaded without errors, users needs to verify the type of transaction displayed from the uploaded file.
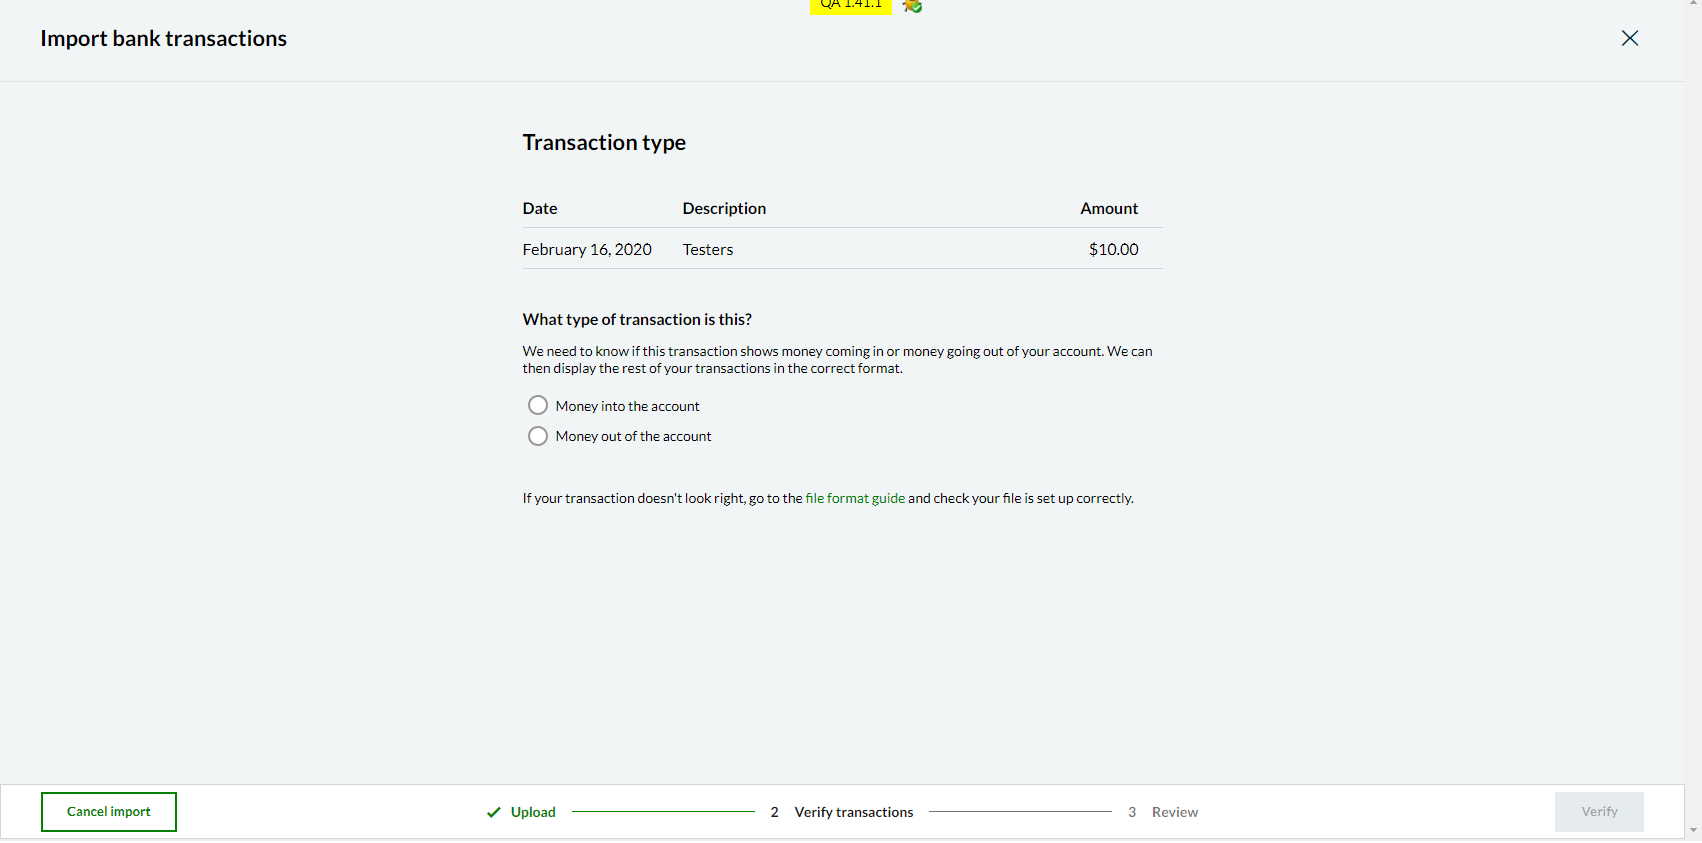
-
Users need to make their selection for the Verify button be enabled and proceed.
<img src=”../images/scenario1-5.png” width=”700px” alt=”Image displaying a transaction from the selected file for the user to determine whether it’s money in or out of the account. Money into the account is selected. />
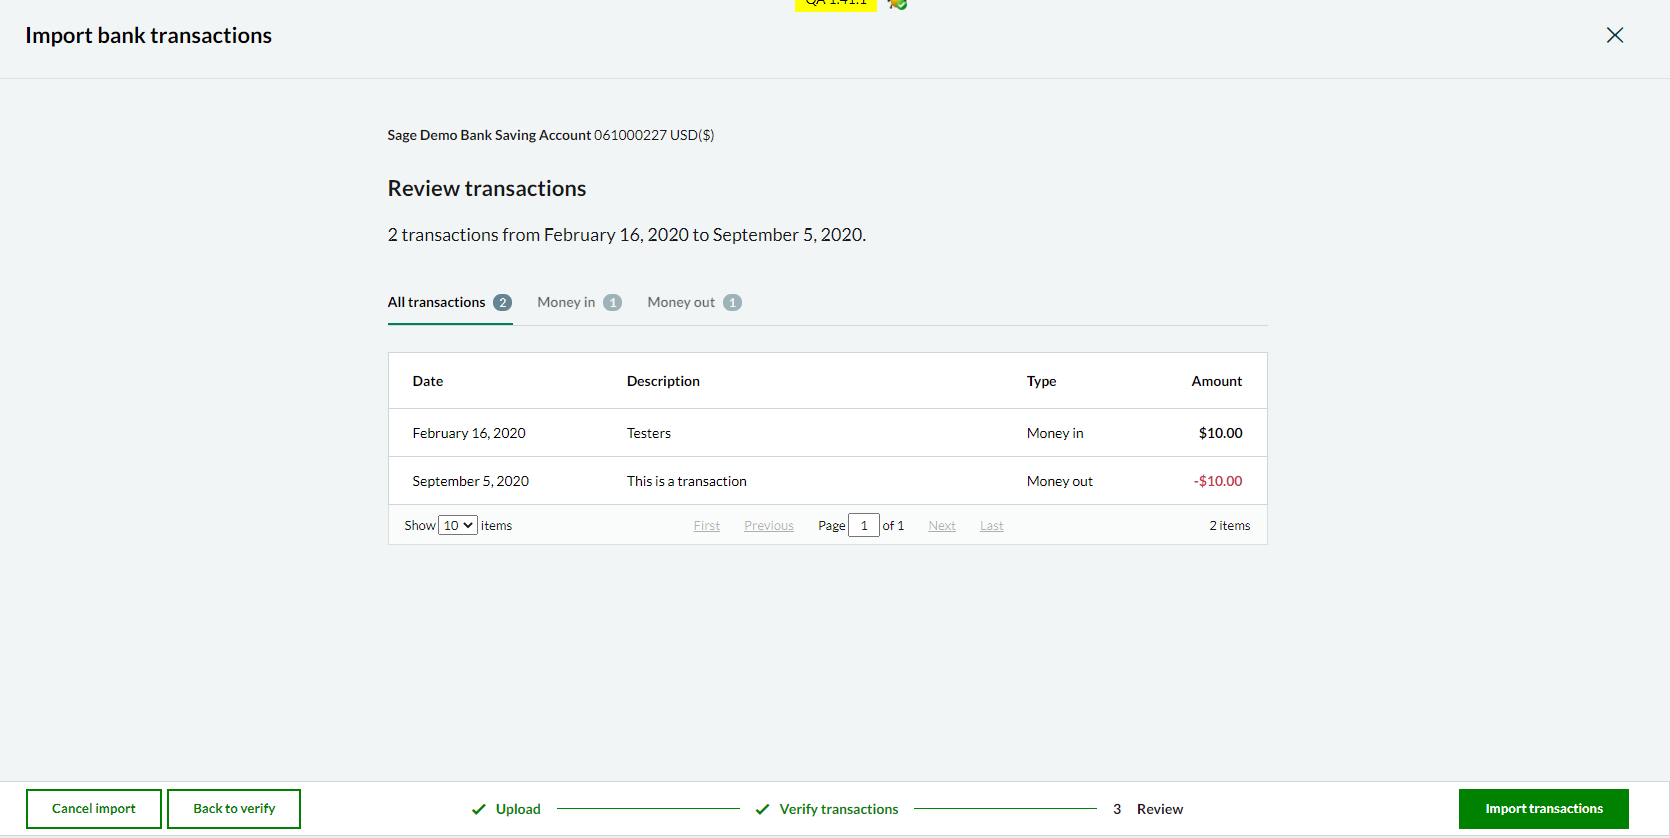
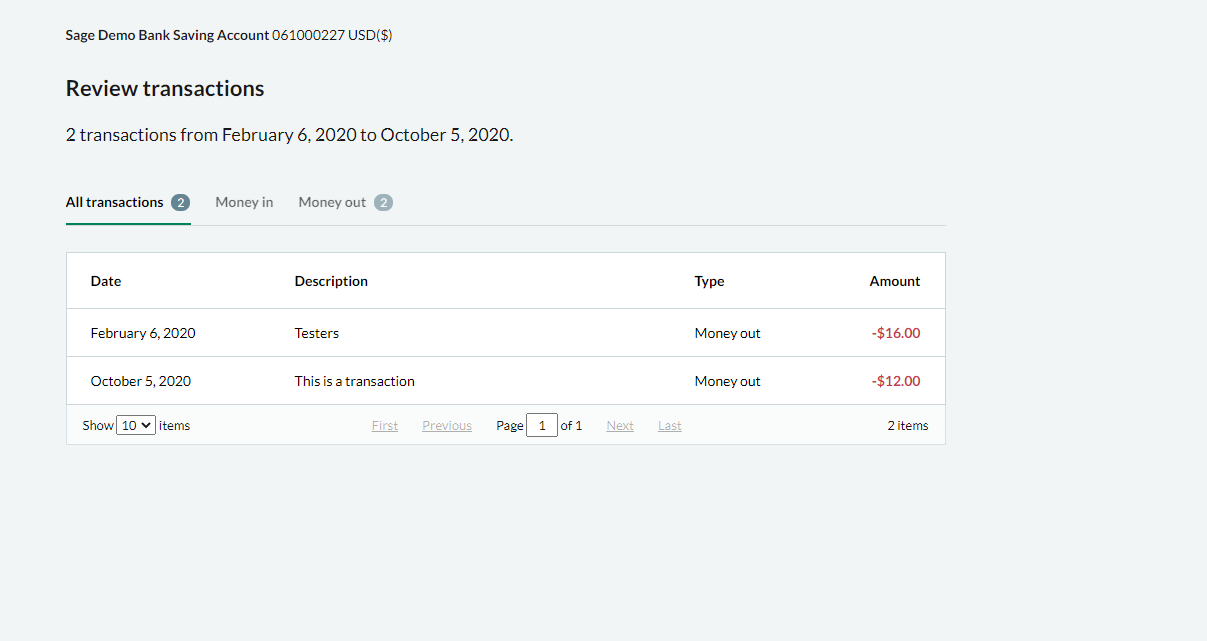
- Review transactions will be displayed with all the data from the uploaded file. All the transactions, bank account details, bank details, transaction date ranges will be displayed.
- Transactions without minus(-) will be displayed as type Money in (Credit)
-
Transactions with minus(-) will be displayed as type Money out (Debit)

- User can review 1 last time before importing transactions. When reviewed, user needs select the Import transactions button.
- System will now start and process the import.
- File import is done successfully.
- User will be routed back to the product page.
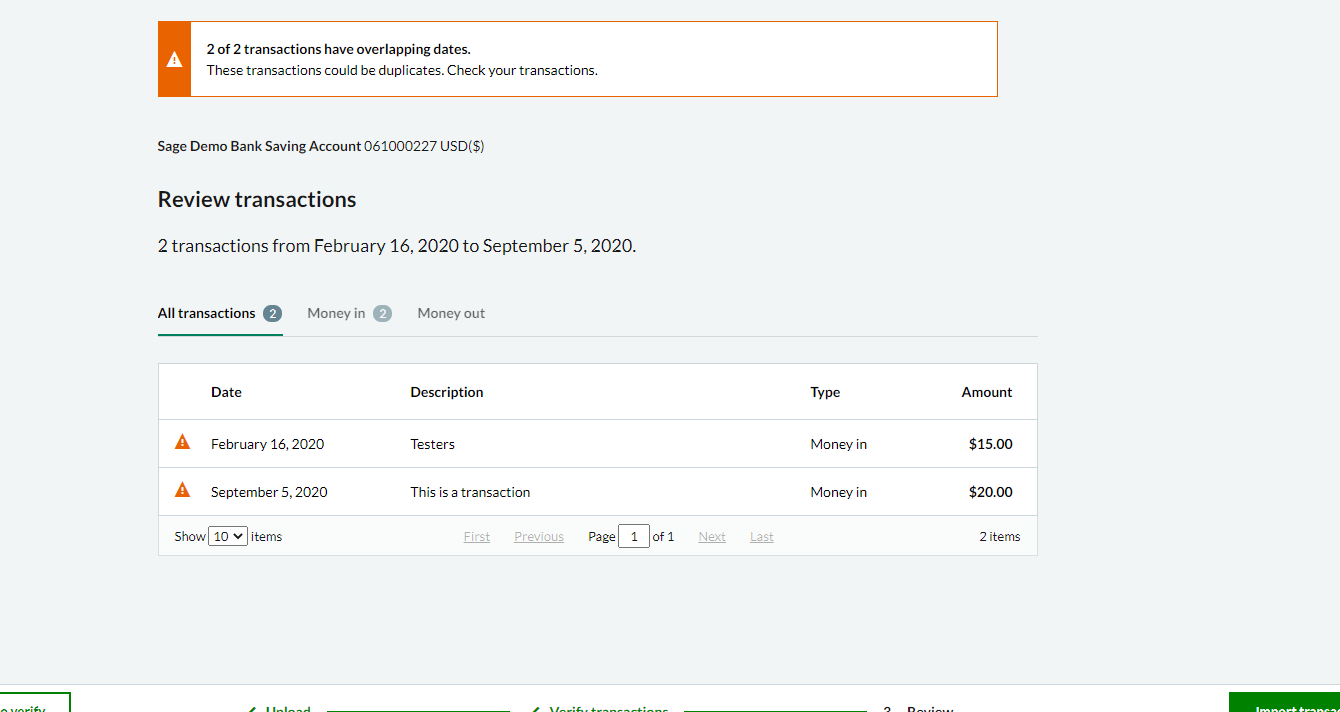
Scenario 2
Successful file upload (CSV file with debit and credit amounts - overlapping dates)_
- Select file type (required).
-
Select the file that will be used for import (required).

- Select the order of dates displayed in the file uploaded in previous step (required).
-
Add comments (required). The regex used to validate special characters that are not allowed is:
/(?=.*^[\w])(?!.*[÷$%^&*()_+|~={}[\]:;<>@#\r\n])/ - Upload file button will be enabled only when all the selections and conditions are met.
-
Click on Upload file.
-
System will now upload the file and backend APIs will validate the file content. If there are any errors or issues with file or selected options (like file type or date format), the appropriate error will be shown to the user.
-
After the file is uploaded without errors, users needs to verify the type of transaction displayed from the uploaded file.

-
Users need to make their selection for the Verify button be enabled and proceed.

- Review transactions will be displayed with with all the data from the uploaded file. All the transactions, bank account details, bank details, transaction date ranges will be displayed.
- Transactions without minus(-) will be displayed as type Money in (Credit)
-
Transactions with minus(-) will be displayed as type Money out (Debit)
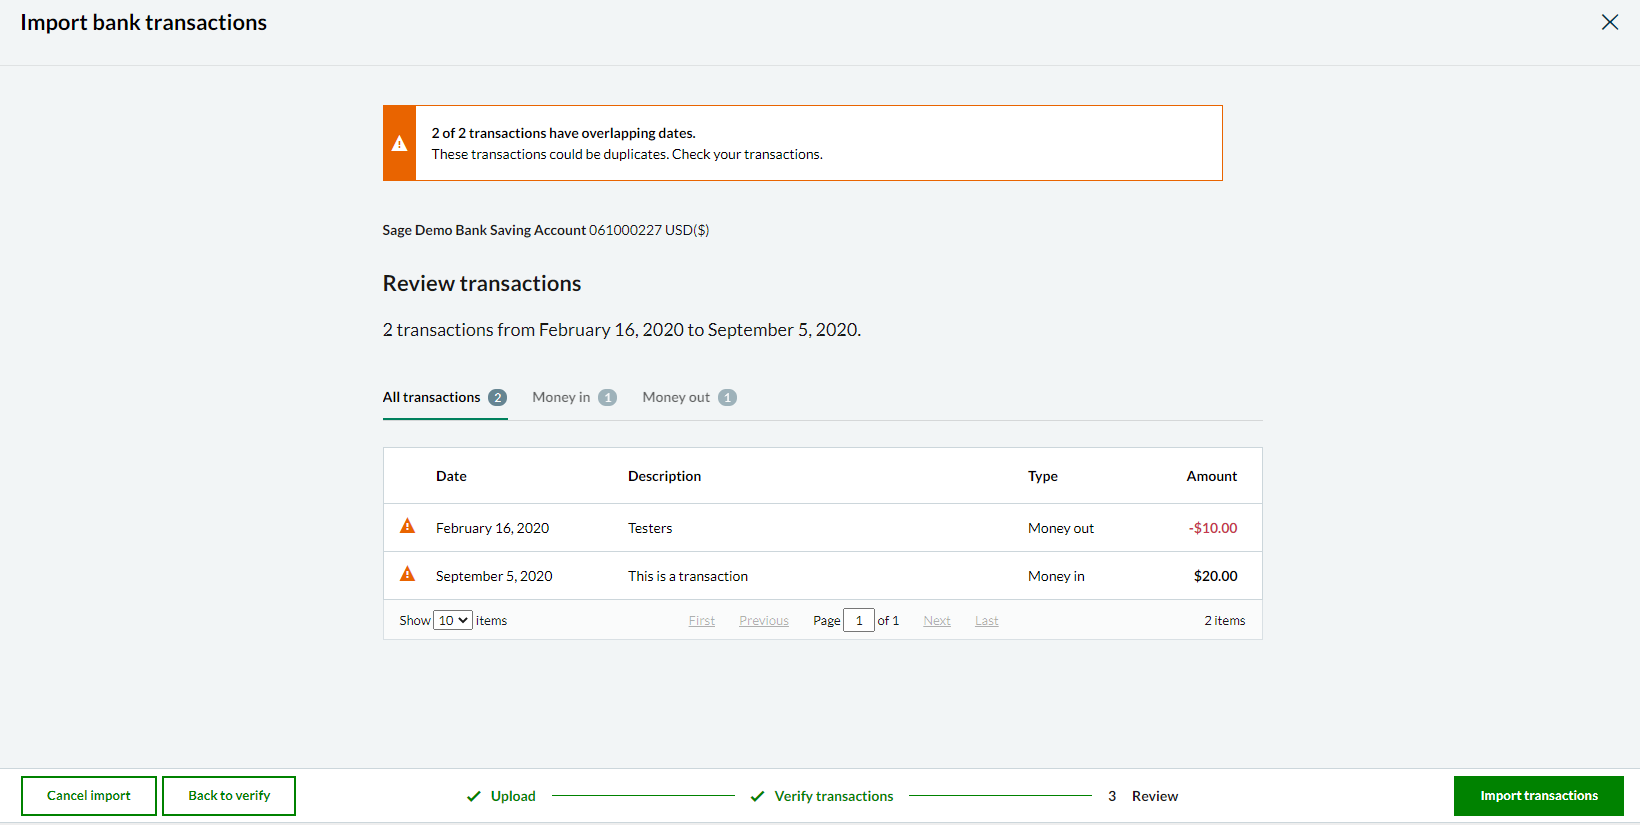
- User can review 1 last time before importing transactions. When reviewed, user needs to select the Import transactions button.
- System will now start and process the import.
- File import is done successfully.
- User will be routed back to the product page.
Scenario 3
Successful file upload (CSV file with only debit amounts)
- Select file type (required).
-
Select the file that will be used for import (required).

- Select the order of dates displayed in the file uploaded in previous step (required).
-
Add comments (required). The regex used to validate special characters that are not allowed is:
/(?=.*^[\w])(?!.*[÷$%^&*()_+|~={}[\]:;<>@#\r\n])/ - Upload file button will be enabled only when all the selections and conditions are met.
-
Click on Upload file.

-
System will now upload the file and backend APIs will validate the file content. If there are any errors or issues with file or selected options (like file type or date format), the appropriate error will be shown to the user.

-
After the file is uploaded without errors, users needs to verify the type of transaction displayed from the uploaded file.

-
Users need to make their selection for the Verify button be enabled and proceed.
- Review transactions will be displayed with with all the data from the uploaded file. All the transactions, bank account details, bank details, transaction date ranges will be displayed.
- Transactions without minus(-) will be displayed as type Money in (Credit)
-
Transactions with minus(-) will be displayed as type Money out (Debit)
- User can review 1 last time before importing transactions. When reviewed, user needs to select the Import transactions button.
- The system will now start and process the import.
- File import is done successfully.
- User will be routed back to the product page.
Scenario 4
Successful file upload (CSV file with debit amounts - flip signs → debit to credit)
File content:

- Select file type (required).
-
Select the file that will be used for import (required).
- Select the order of dates displayed in the file uploaded in previous step (required).
-
Add comments (required). The regex used to validate special characters that are not allowed is:
/(?=.*^[\w])(?!.*[÷$%^&*()_+|~={}[\]:;<>@#\r\n])/ - Upload file button will be enabled only when all the selections and conditions are met.
-
Click on Upload file.

-
System will now upload the file and backend APIs will validate the file content. If there are any errors or issues with file or selected options (like file type or date format), the appropriate error will be shown to the user.

-
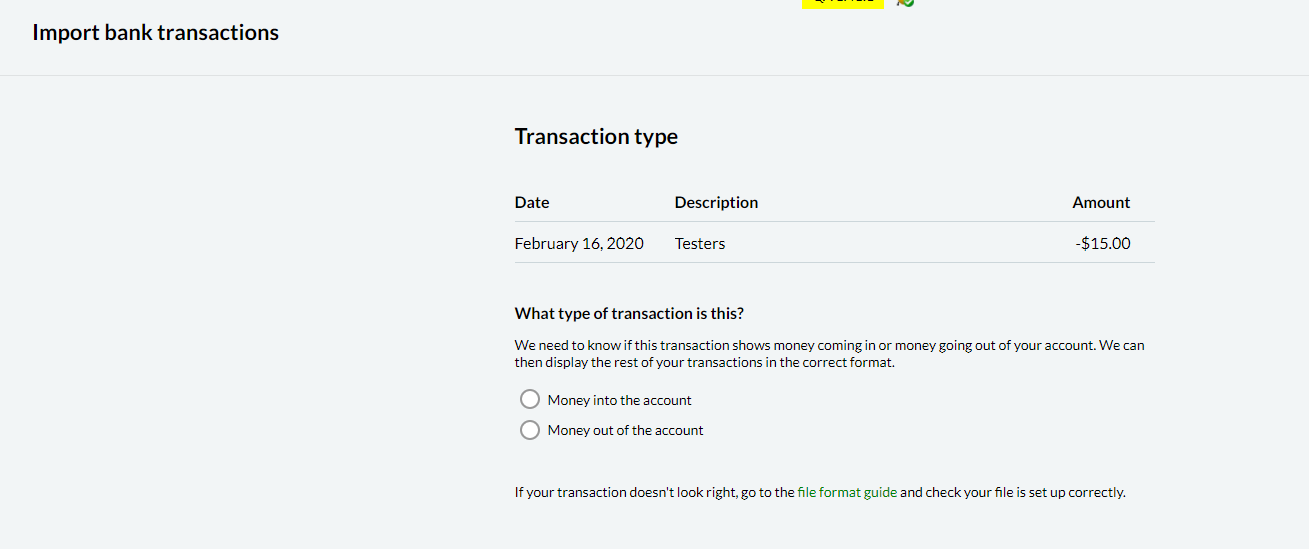
After the file is uploaded without errors, users needs to verify the type of transaction displayed from the uploaded file.
-
In this scenario, the selected file contains only Debit transactions (Money out of the account), but will go ahead and verify/select Money into the account for the displayed transaction.

- Review transactions will be displayed with with all the data from the uploaded file. All the transactions, bank account details, bank details, transaction date ranges will be displayed.
- The transaction type will be flipped from what it is in the imported file. Debit transactions are now converted to Credit transactions.
-
Transactions without minus(-) will be displayed as type Money in (Credit).
- User can review 1 last time before importing transactions. When reviewed, user needs to select the Import transactions button.
- The system will now start and process the import.
- File import is done successfully.
- User will be routed back to the product page.
Scenario 5
Successful file upload (CSV file with credit amounts - flip signs → credit to debit)
File content:

- Select file type (required).
-
Select the file that will be used for import (required).
- Select the order of dates displayed in the file uploaded in previous step (required).
-
Add comments (required). The regex used to validate special characters that are not allowed is:
/(?=.*^[\w])(?!.*[÷$%^&*()_+|~={}[\]:;<>@#\r\n])/ - Upload file button will be enabled only when all the selections and conditions are met.
-
Click on Upload file.

-
System will now upload the file and backend APIs will validate the file content. If there are any errors or issues with file or selected options (like file type or date format), the appropriate error will be shown to the user.

-
After the file is uploaded without errors, users needs to verify the type of transaction displayed from the uploaded file.
-
In this scenario, the selected file contains only credit transactions (Money into the account), but will go ahead and verify/select Money out of the account for the displayed transaction
- Review transactions will be displayed with with all the data from the uploaded file. All the transactions, bank account details, bank details, transaction date ranges will be displayed.
- The transaction type will be flipped from what it is in the imported file. Credit transactions are now converted to Debit transactions. (Money in → Money out)
-
Transactions with minus(-) will be displayed as type Money out(Debit)
- User can review 1 last time before importing transactions. When reviewed, user needs to select the Import transactions button.
- The system will now start and process the import.
- File import is done successfully.
- User will be routed back to the product page.
Scenario 6
Cancel file import
- Select file type (required).
-
Select the file that will be used for import (required).
- Select the order of dates displayed in the file uploaded in previous step (required).
-
Add comments (required). The regex used to validate special characters that are not allowed is:
/(?=.*^[\w])(?!.*[÷$%^&*()_+|~={}[\]:;<>@#\r\n])/ - Upload file button will be enabled only when all the selections and conditions are met.
-
Click on Upload file.

-
System will now upload the file and backend APIs will validate the file content. If there are any errors or issues with file or selected options (like file type or date format), the appropriate error will be shown to the user.

-
After the file is uploaded without errors, users needs to verify the type of transaction displayed from the uploaded file.

-
If the user wants to cancel file import, they can select the Cancel import button. A cancellation dialogue will be displayed for the user to confirm.
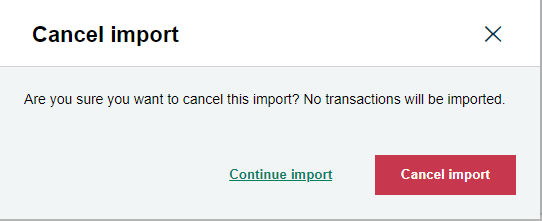
- Selecting Cancel import inside the dialogue will confirm the cancellation and the system will cancel the import process.
- File import is cancelled successfully.
- User will be routed back to the product page.