- Either download and install the Postman for Windows application, then launch it.
- Or access Postman on the web.
Test your first query in Postman
Quick Links
Accounts Accounting Entries Products Customers Sales quotes Sales invoices Suppliers Purchase invoicesBy using Postman, you will be able to test your first requests via Sage Active Public API V2.
We are going to :
- authenticate ourselves to use Sage Active Public API V2,
- request the list of organizations authorized for this user,
- choose an organization,
- and then request, for this organization, the list of accounting journals that we have previously seen from the Sage Active interface.
1. Run Postman
2. Add the collection and the environment in Postman
-
Download the collection for Postman
Download the Sage Active Public API collection for Postman -
Depending on your Sage Active subscription environment, download the corresponding Postman environment.
Download the Sage Active Public API FR environment for Postman
Download the Sage Active Public API ES environment for Postman
Download the Sage Active Public API DE environment for Postman
Download the Sage Active Public API PT environment for Postman -
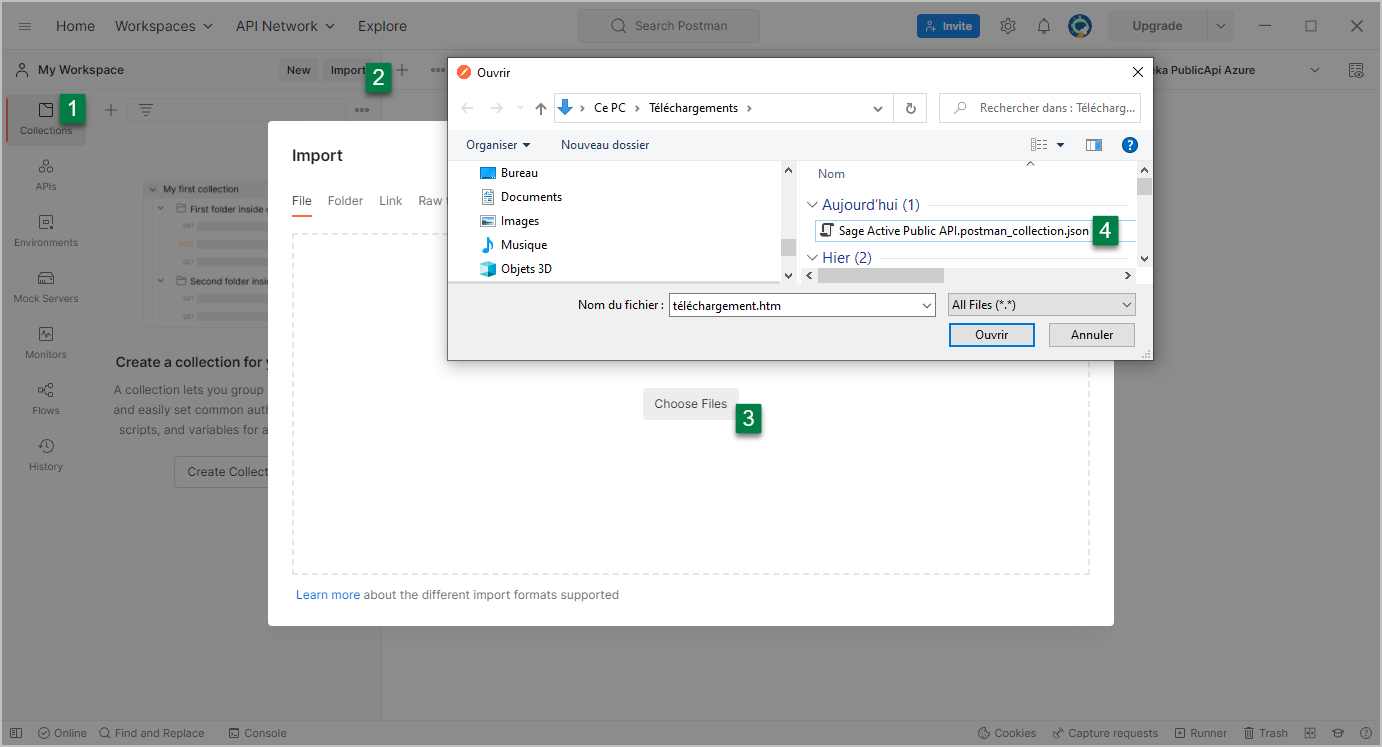
Import the Postman Collection
- Open Postman, go to Collections.
- Click on Import.
- Click on Choose Files.
- Select and open the first downloaded file: Sage Active Public API V2.postman_collection.json.
-
Repeat the same operation for the second file:
- Stay in the same place.
- Click again on Import.
- Click on Choose Files.
- Select and open the second downloaded file: Sage Active Public API XX.postman_environment.json.
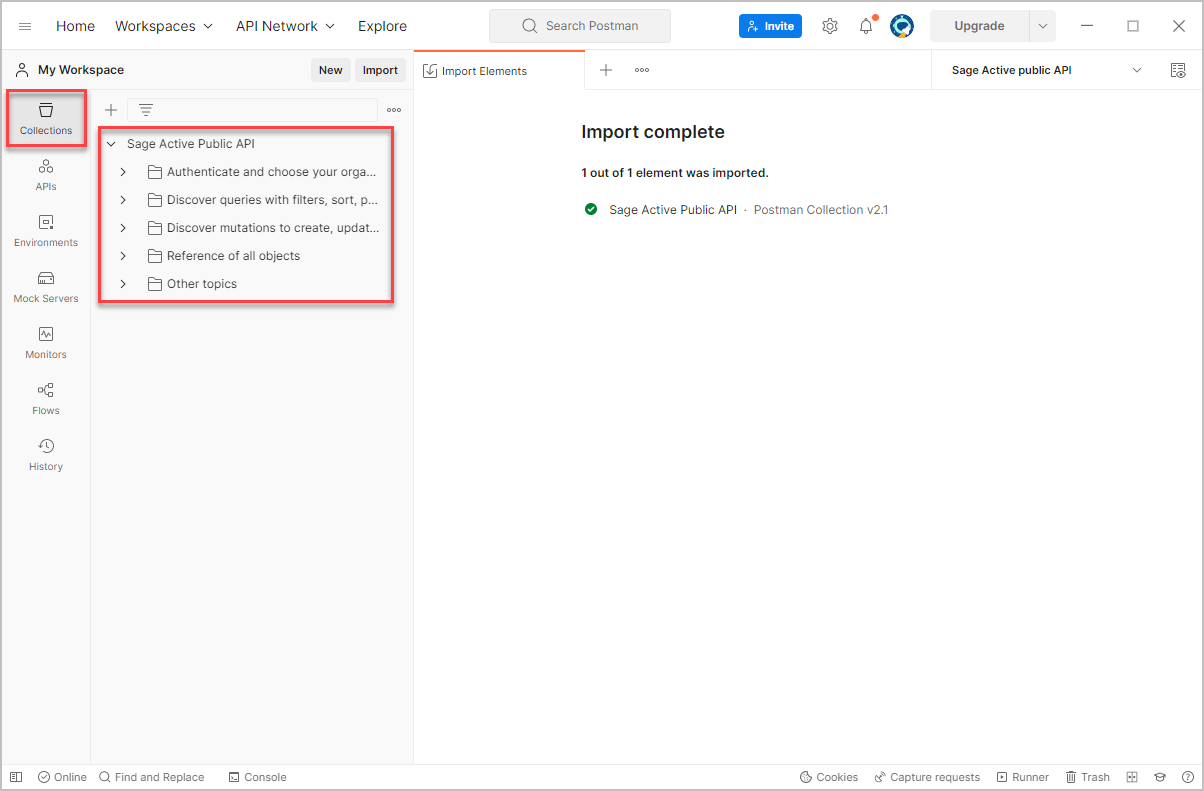
The collection Sage Active Public API is now available in Postman.
As well as the environment Environment Sage Active Public API related to Your Sage Active.
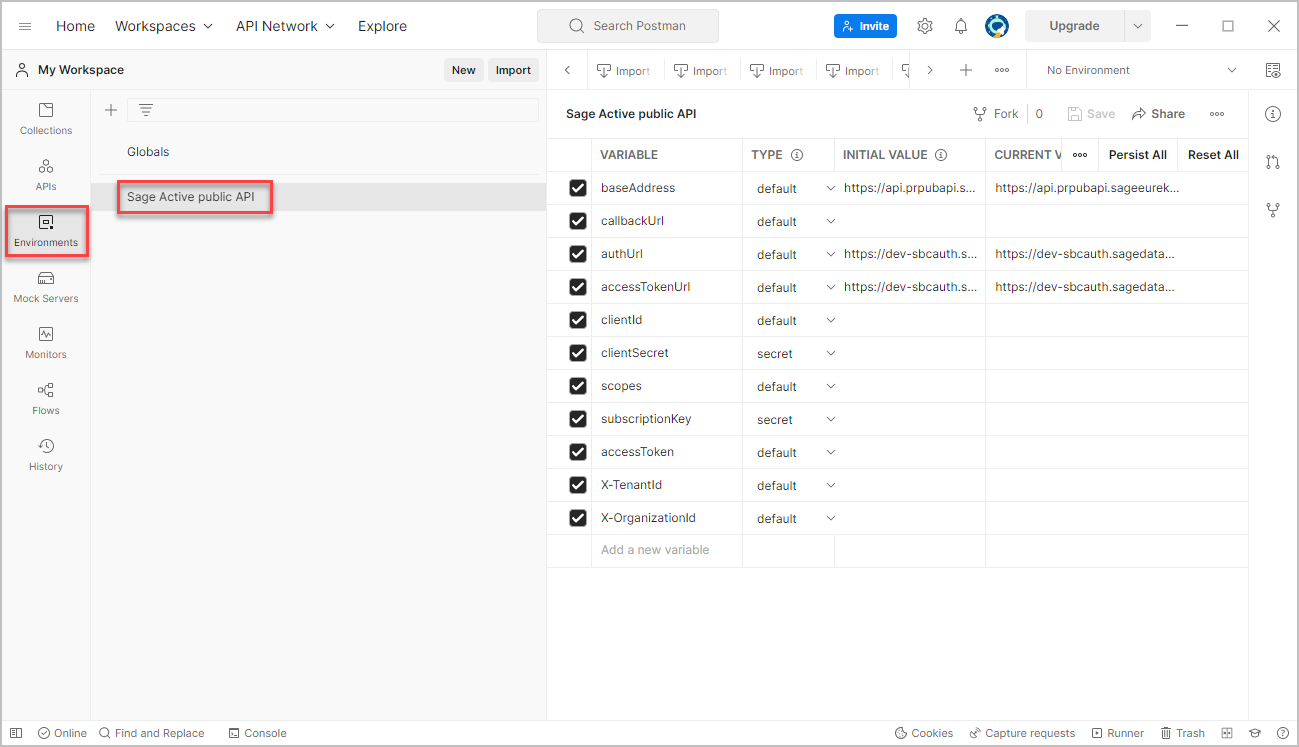
3. Authentication configuration
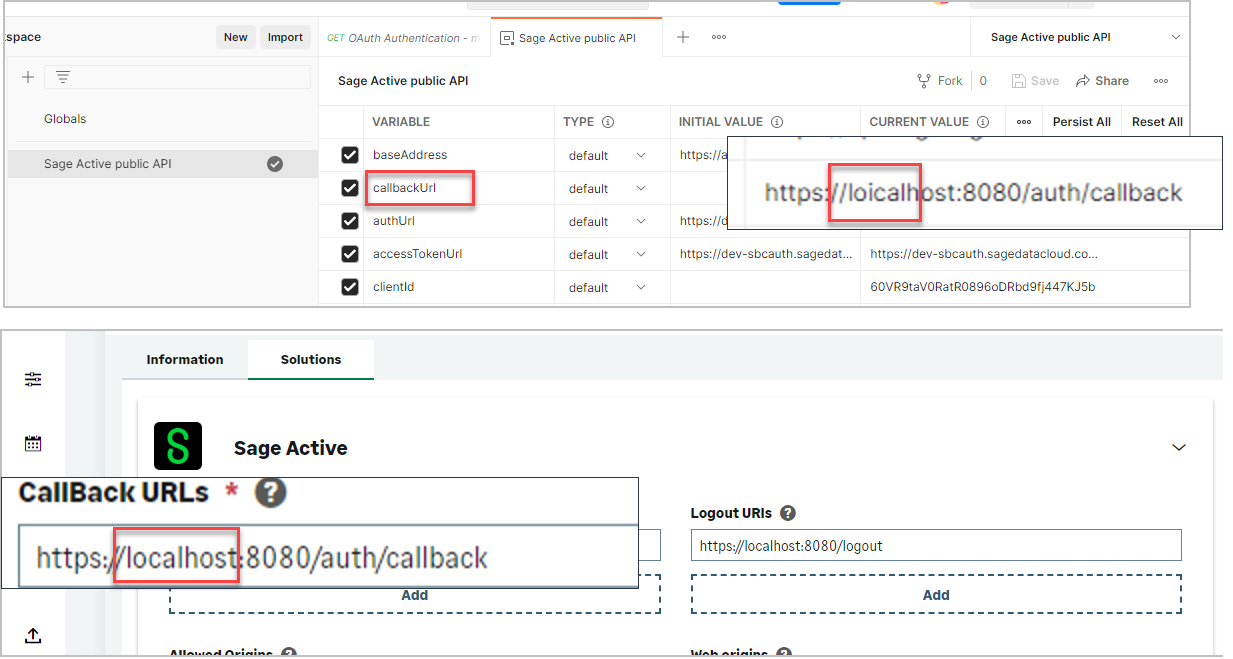
Complete the list of variables
-
Note that the Postman environment already has the following values set for :
- Here are the different URLs for using the
FR,ES / PT,DEAPI and authenticating your application. - The URLs for the SBCAuth authentication service are the same for all three production environments.
-
In Postman environnement baseAddress = API Address without
/graphql.Sage Active FR
API AddressSage Active ES / PT
API AddressSage Active DE
API AddressAuthentication
AuthUrlAccessTokenUrlRevoke Token URL prod
- Here are the different URLs for using the
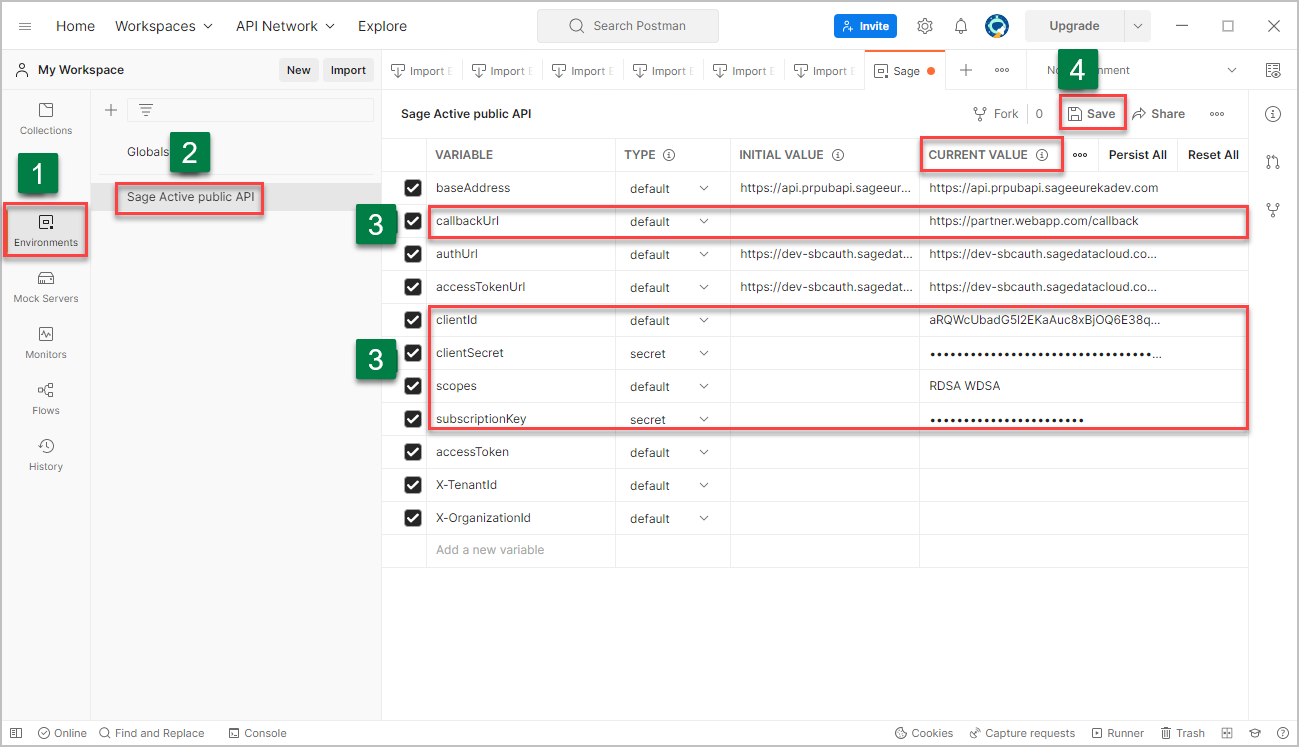
- Click on Environment in Postman to see the environment named Environment Sage Active Public API.
- Click Environment Sage Active Public API
- Fill in CURRENT VALUE column following values that you will retrieve from the Solutions tab of your application :
-
Click Save
Attention
- In the context of this quickstart, for scopes, please choose :
RDSARead Sage Active Data andWDSAWrite Sage Active Data to remain consistent with the rest of the journey and the read and write permissions you just granted in your application. - If you are using Postman Web, the callback URL is automatically defined by Postman and may vary depending on the environment or configuration.
You should copy the callback URL displayed in your Postman instance and add it in the Solutions tab of your application.
In this case, you do not need to provide thecallBackUrlvariable.
If the callback URL in Postman matches the example below, you can reuse this value.
- In callBackUrl VARIABLE (Postman for windows only), the first
Callback URLthat you have filled, - in clientId VARIABLE, the
Client ID, - in clientSecret VARIABLE, the
Client Secret, -
in scopes VARIABLE, the
Permissions:RDSAif you have chosen Read Sage Active DataWDSAas well if you have chosen Write Sage Active Data
- in subscriptionKey VARIABLE, the
Subscription Primary key.
Remember, get the values from the Solutions tab of your application:
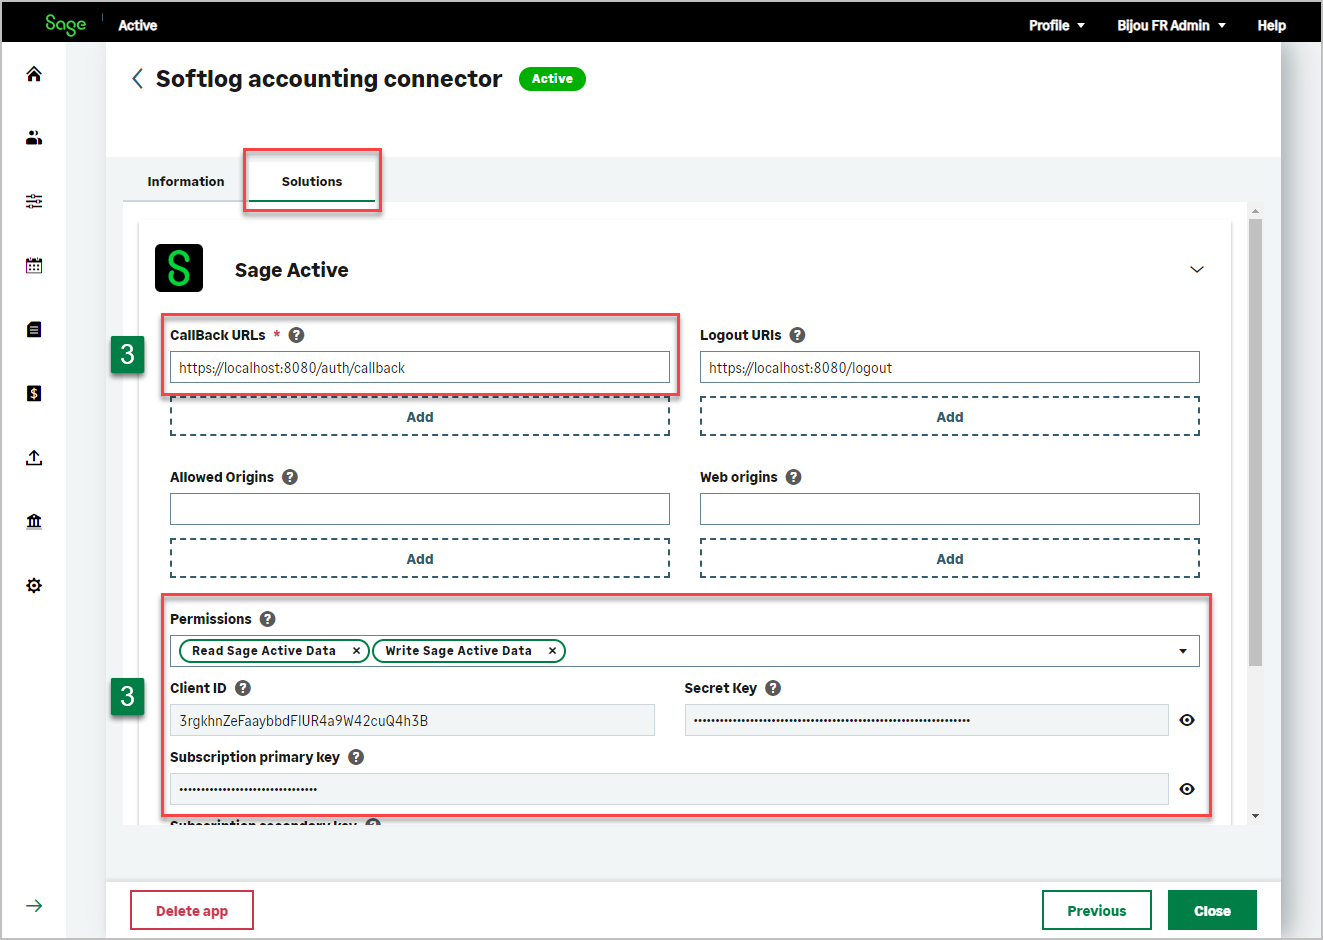
- In the context of this quickstart, for scopes, please choose :
4. Ask a New Access Token
- Go to Collections and choose Sage Active Public API.
- In the header, on the right, choose the environment Environment Sage Active Public API.
- Open folder Authenticate and choose your organization, then Oauth Authentication.
- Click Auth tab,
- Then click Get New Access Token button.
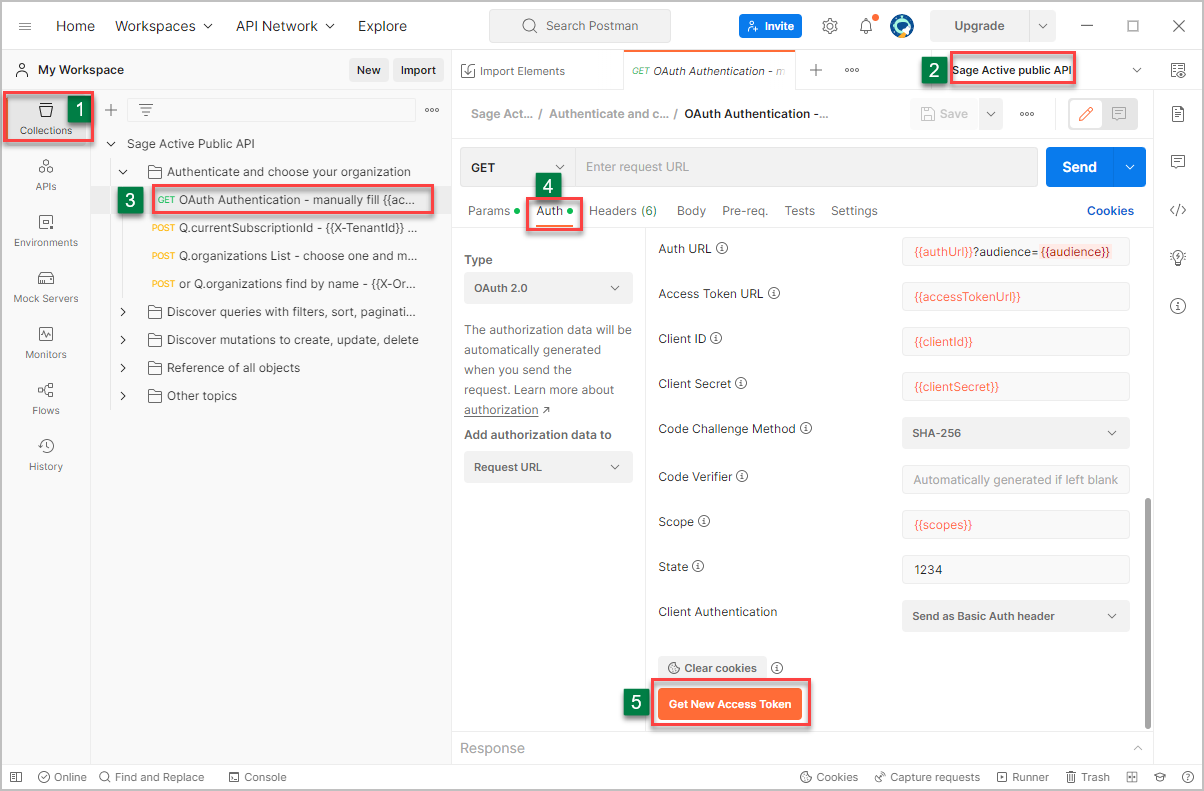
Note that all parameters of this Auth tab that contain variables will have their values populated by the variables defined in the chosen environment.
What if an error occurs at this stage?
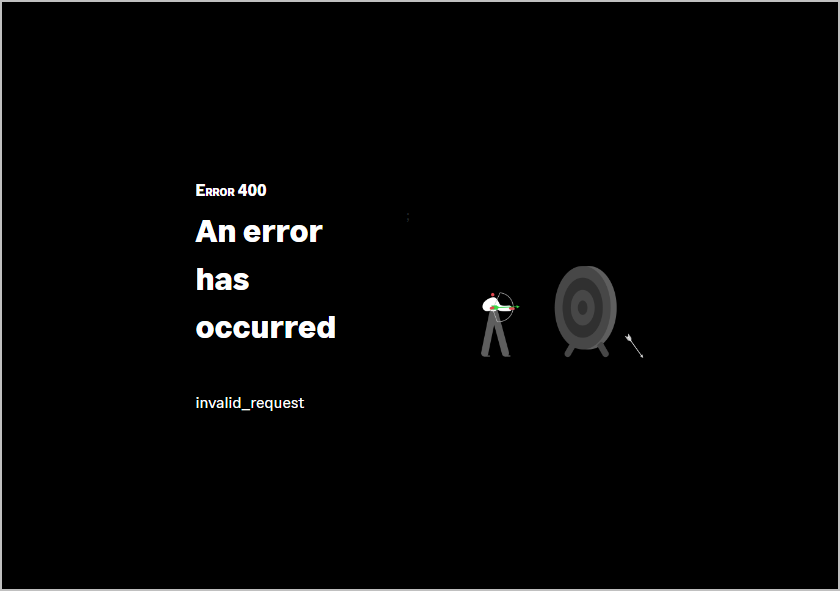
-
Postman Windows:
Check that the CallBack URL mentioned in the environment variable is the same as one of those in the Solution tab of your application. -
Postman Web:
Check that the callback URL below is the same as one of those in the Solution tab of your application.
Example of callBack URL mismatch error for Postman Windows
Authentication checking
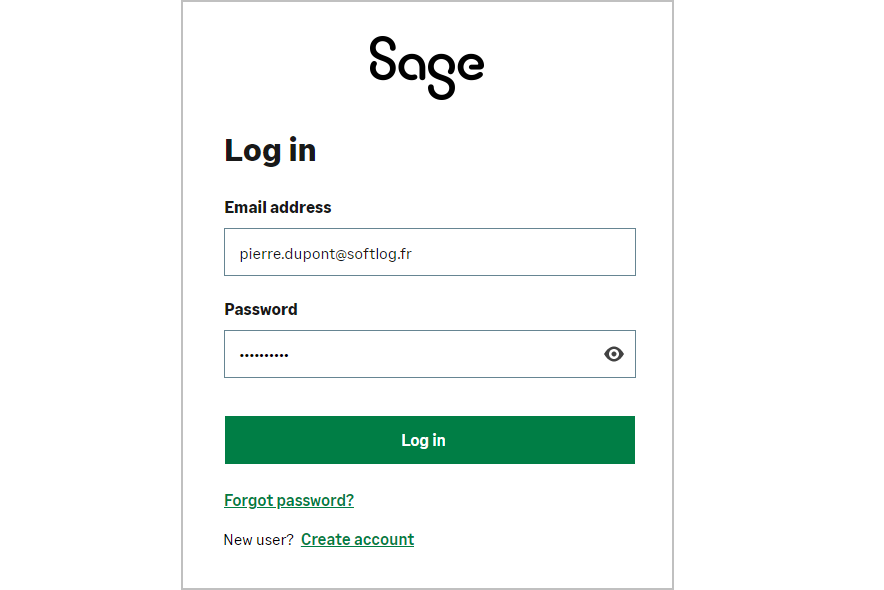
You will now be prompted to login to your application.
-
The window for connecting to your application appears.
Enter the email and password of your Sage Active account and validate.
-
Now you need to give your app permission to access your Sage Active data
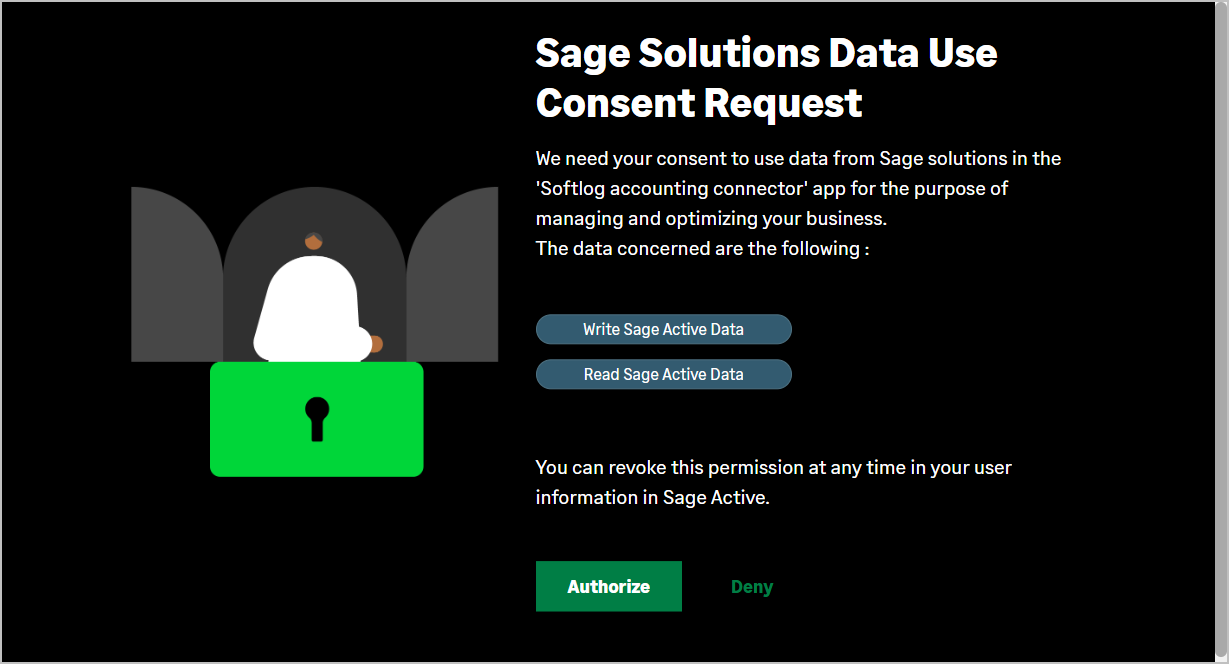
Do you want to know how a user can revoke their consent?
-
From Your Sage Active,
Click on Configuration / Public API / Consents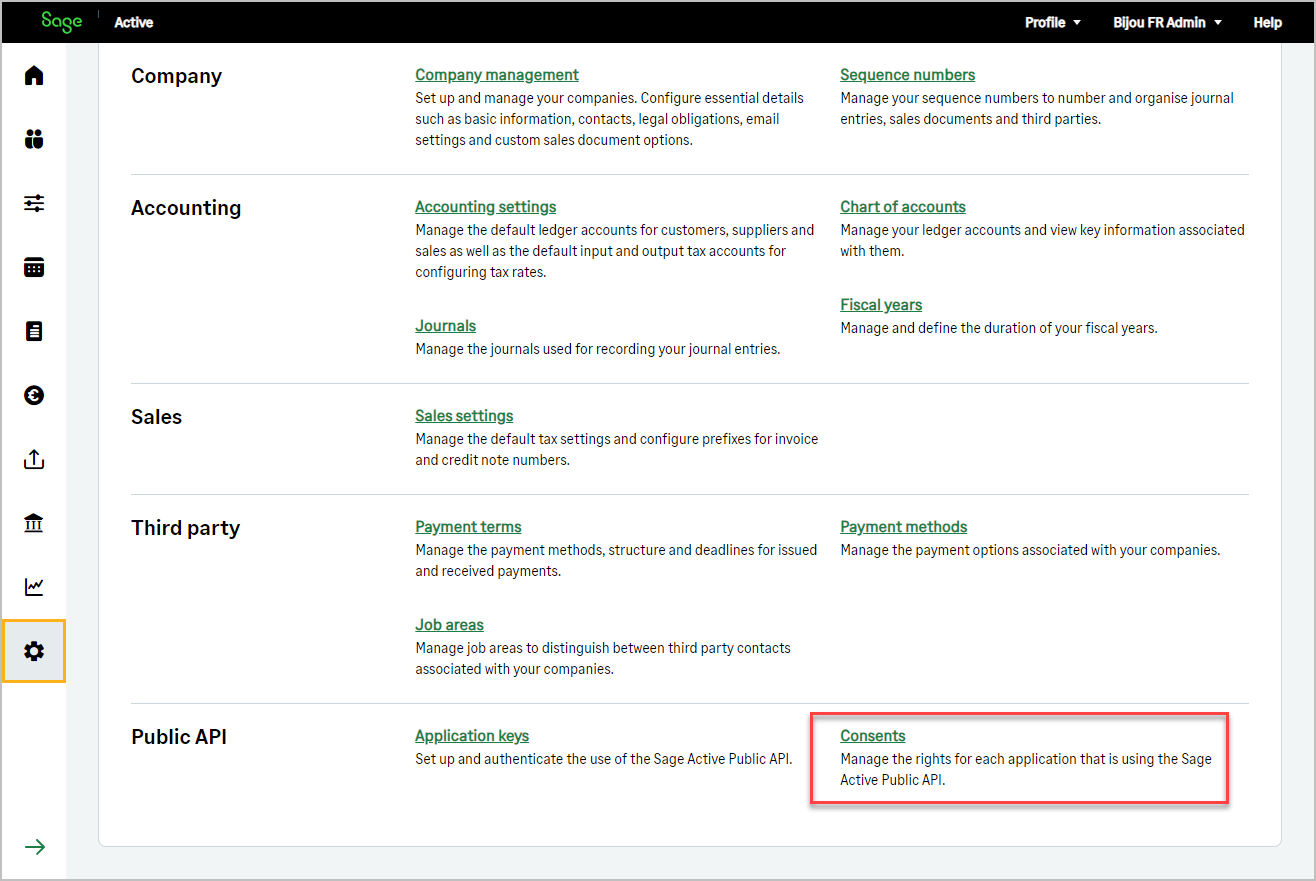
-
The list of consents, granted for the different applications using the Sage Active Public API V2, appears.
From this list, it is possible to revoke consents.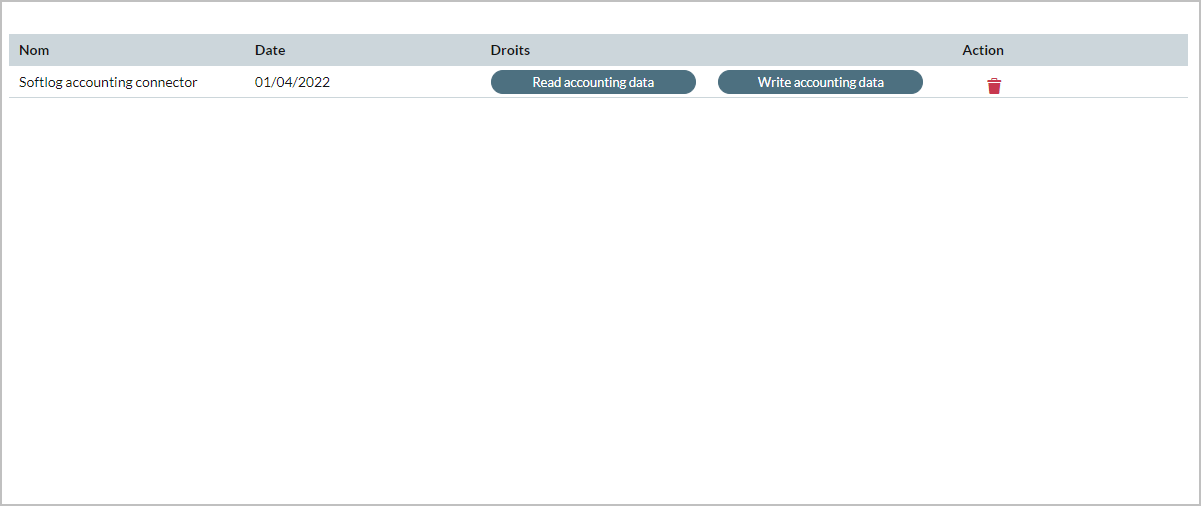
-
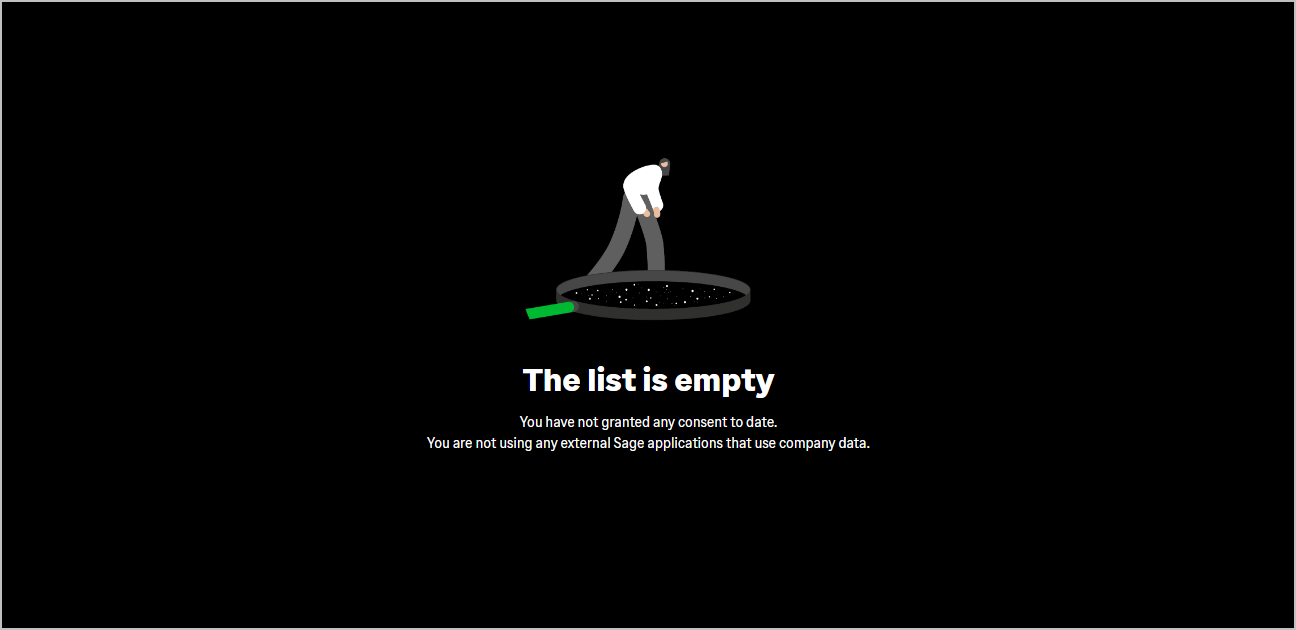
If an app’s consents have been revoked, when you later relaunch the app, the consent approval request will be offered again.
-
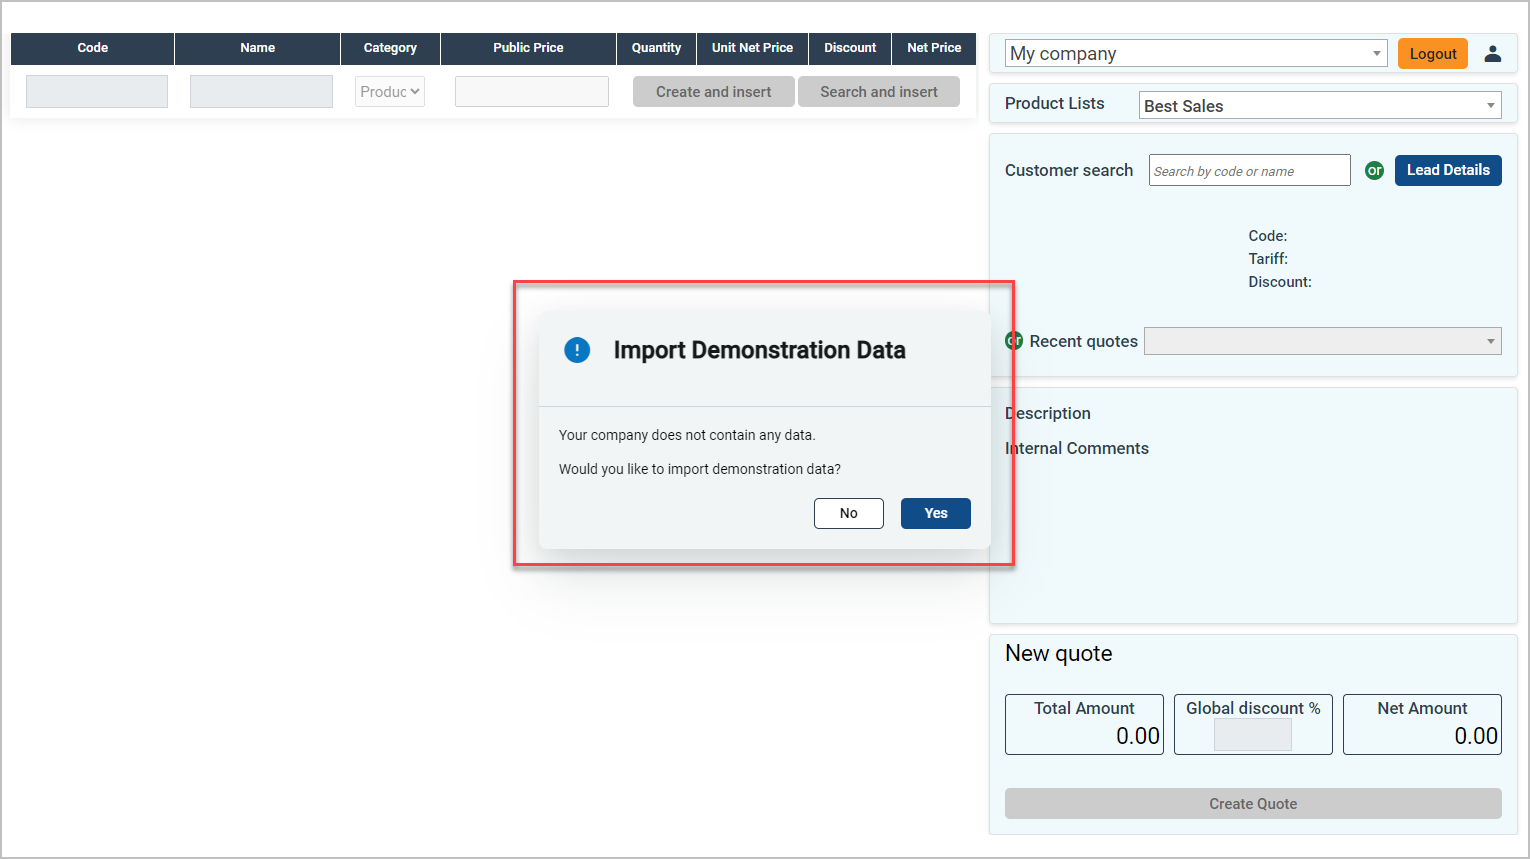
If the user has not granted any consent, this screen will be displayed:
5. Use Token
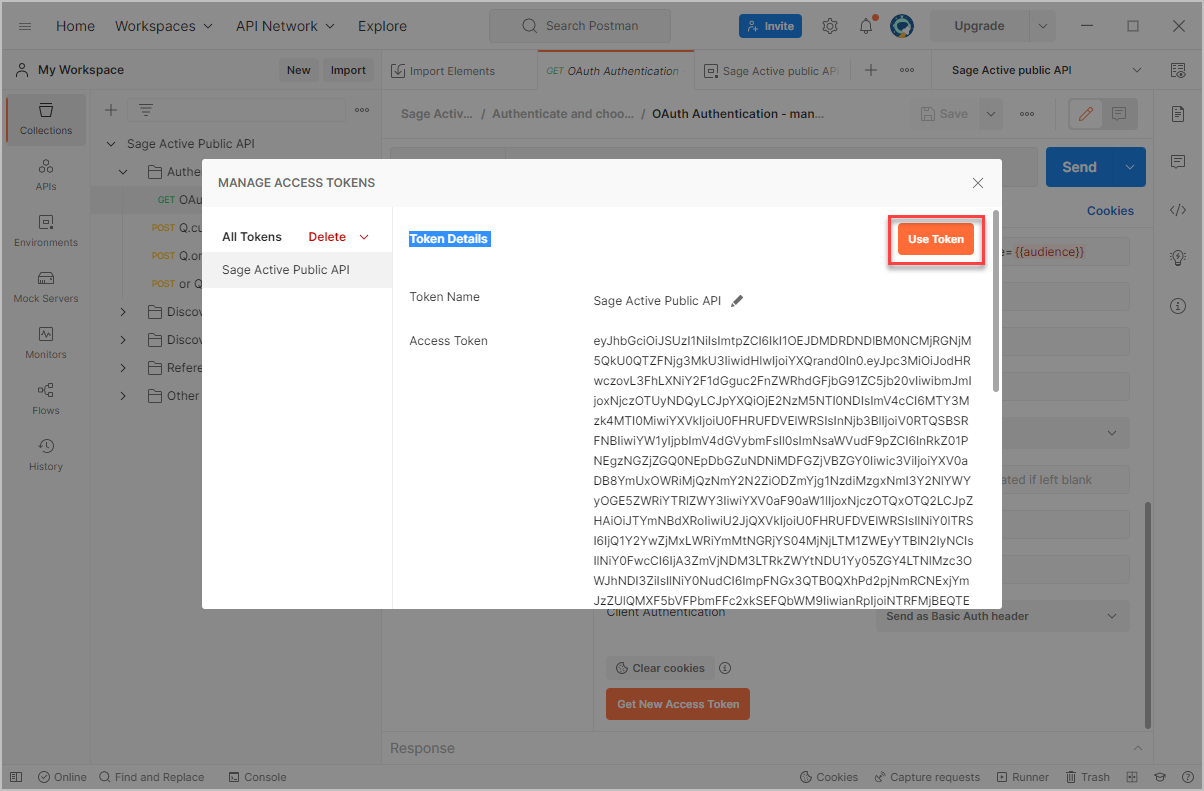
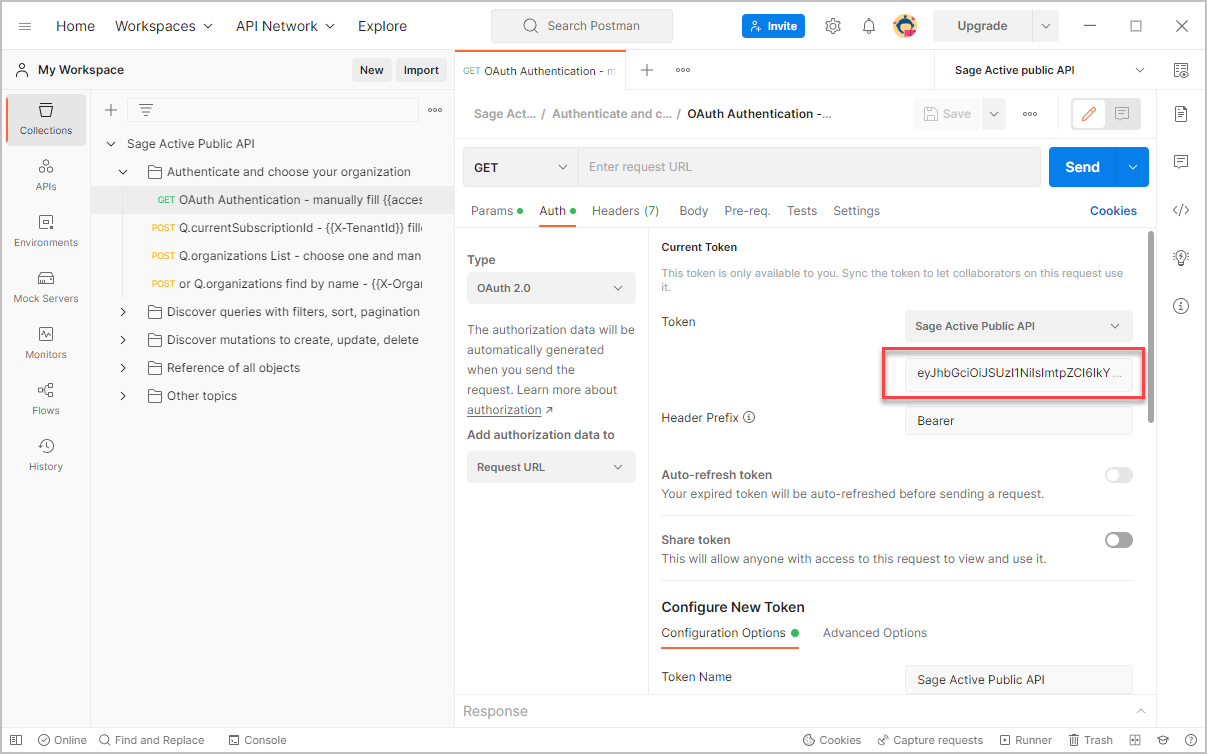
- You now have an access token. Click on Use Token.
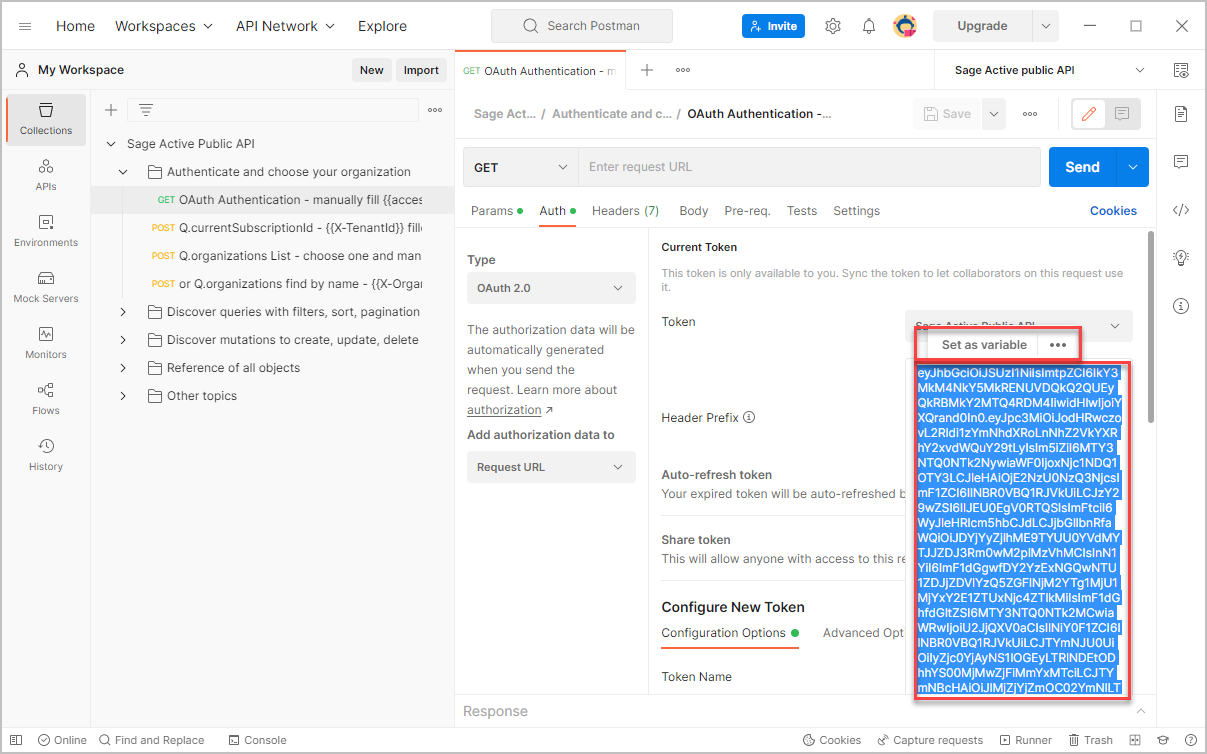
- Move up to the authentication page to see the Token field:
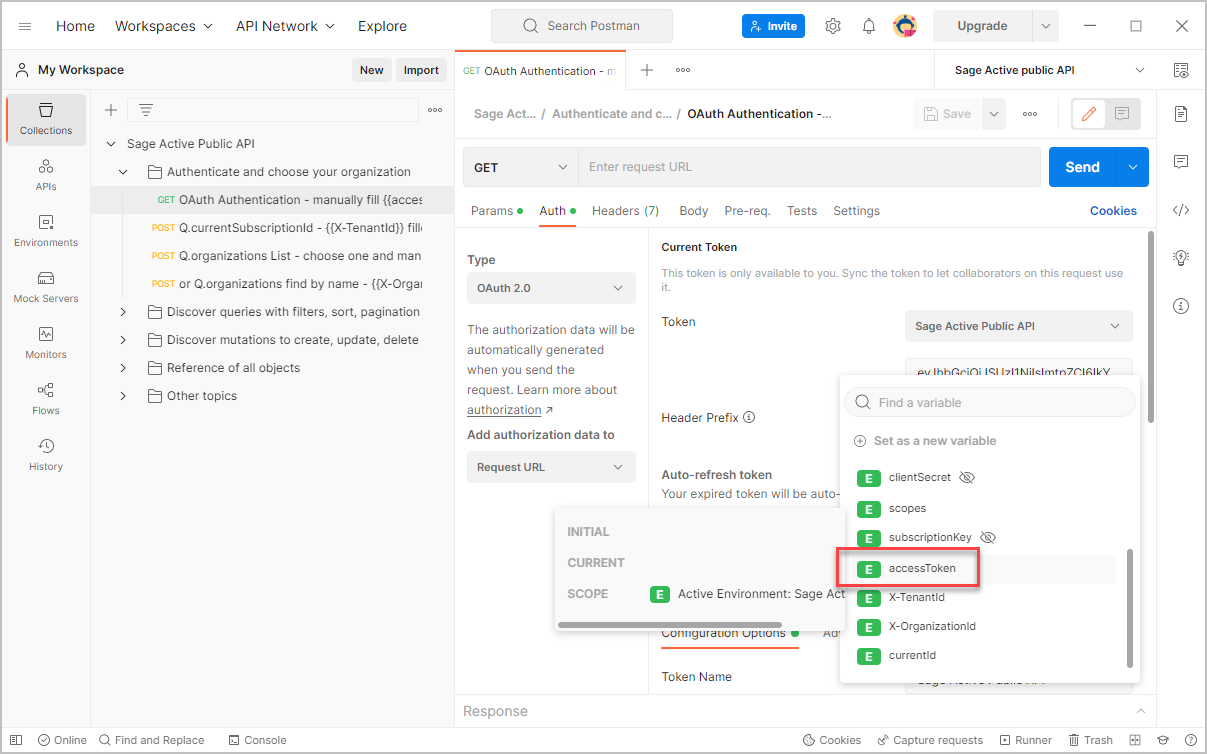
- Click once in the field to display the complete token, then click 3 times to select it, then click Set as variable
- Choose from the list of variables: accessToken,
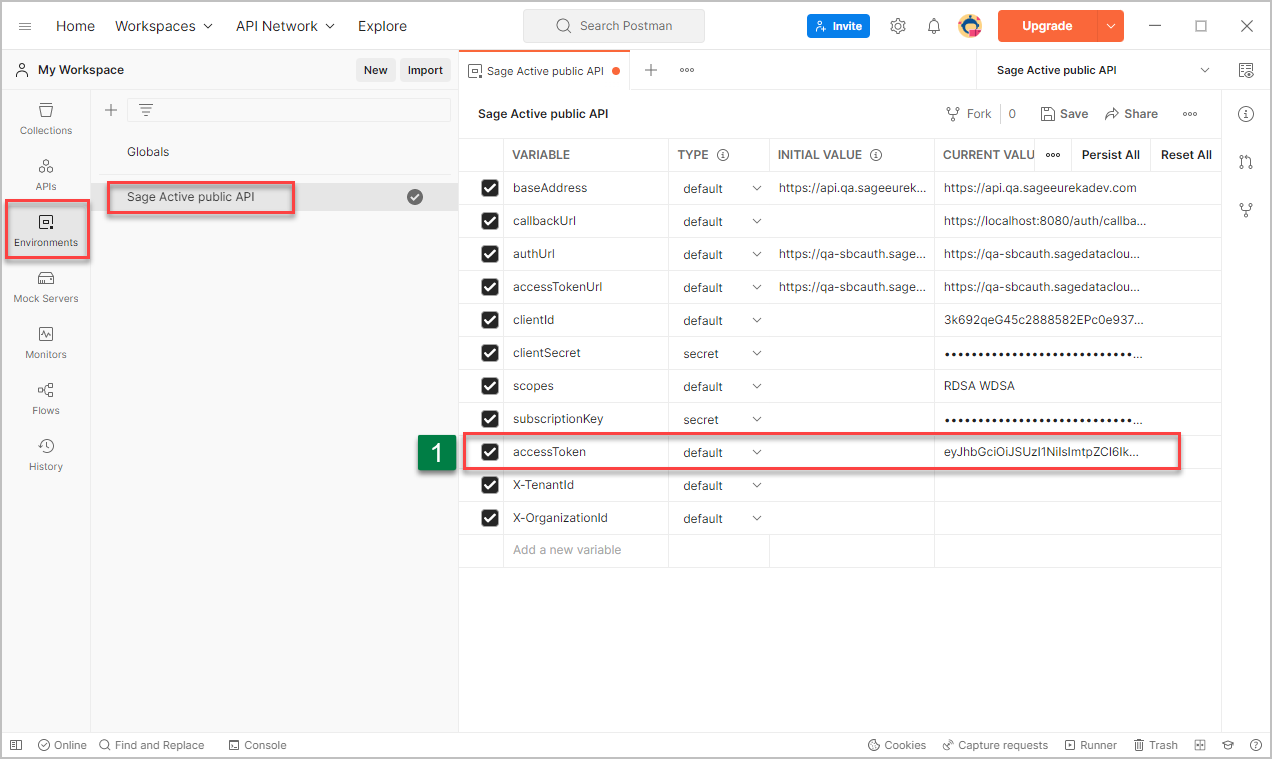
This will add the token to the variable accessToken in the Environment Sage Active Public API environment.
Great, you now have an authentication token and you can run your first query.
Attention
do not mistake, choose accessToken and especially not accessTokenUrl
6. Choose an organization and request the list of Journals
For our example we are going to request :
- the list of authorized organizations for the current user to retrieve the id of an organization.
- then the list of journals in this organization.
Request the list of organizations
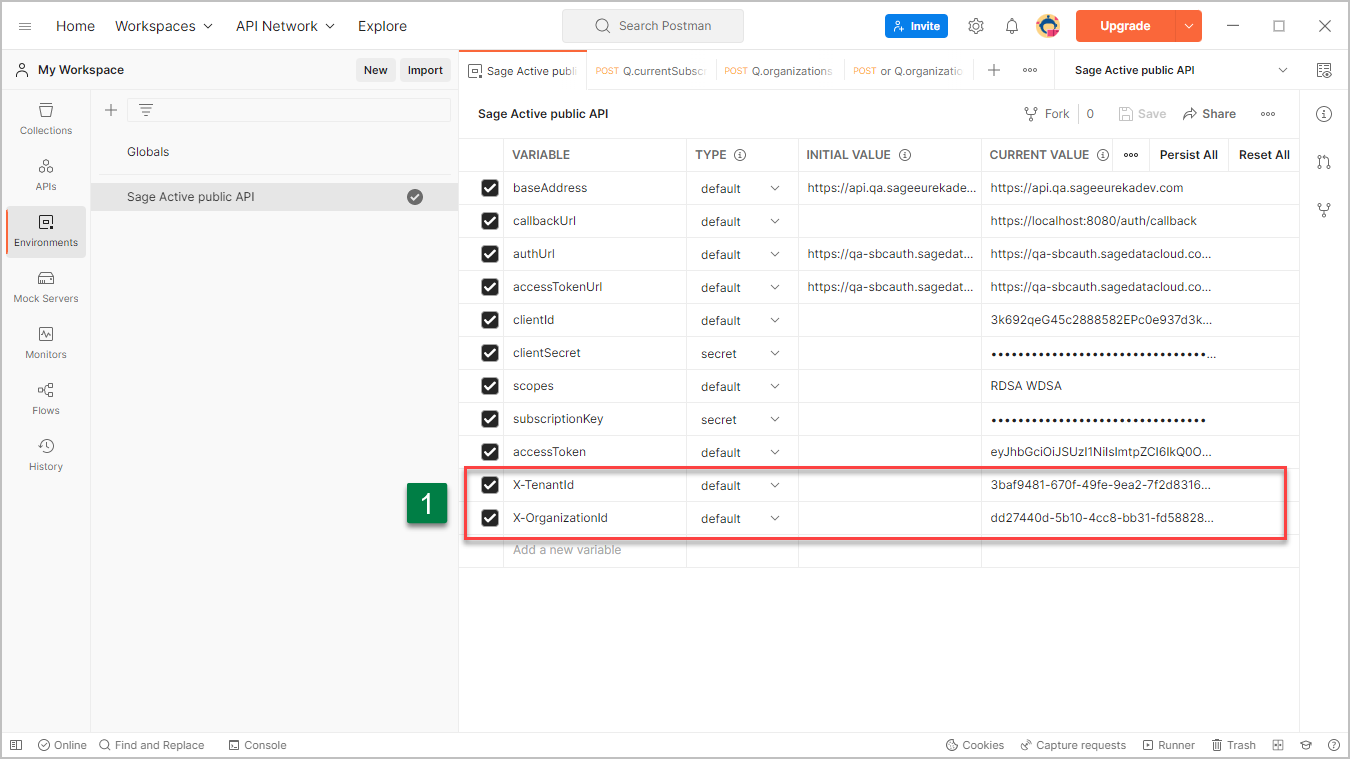
- First, check in the environment Environment Sage Active Public API, if the variable accessToken is now filled.
Otherwise, without access Token you cannot query the list of organizations and you need to repeat the previous step.
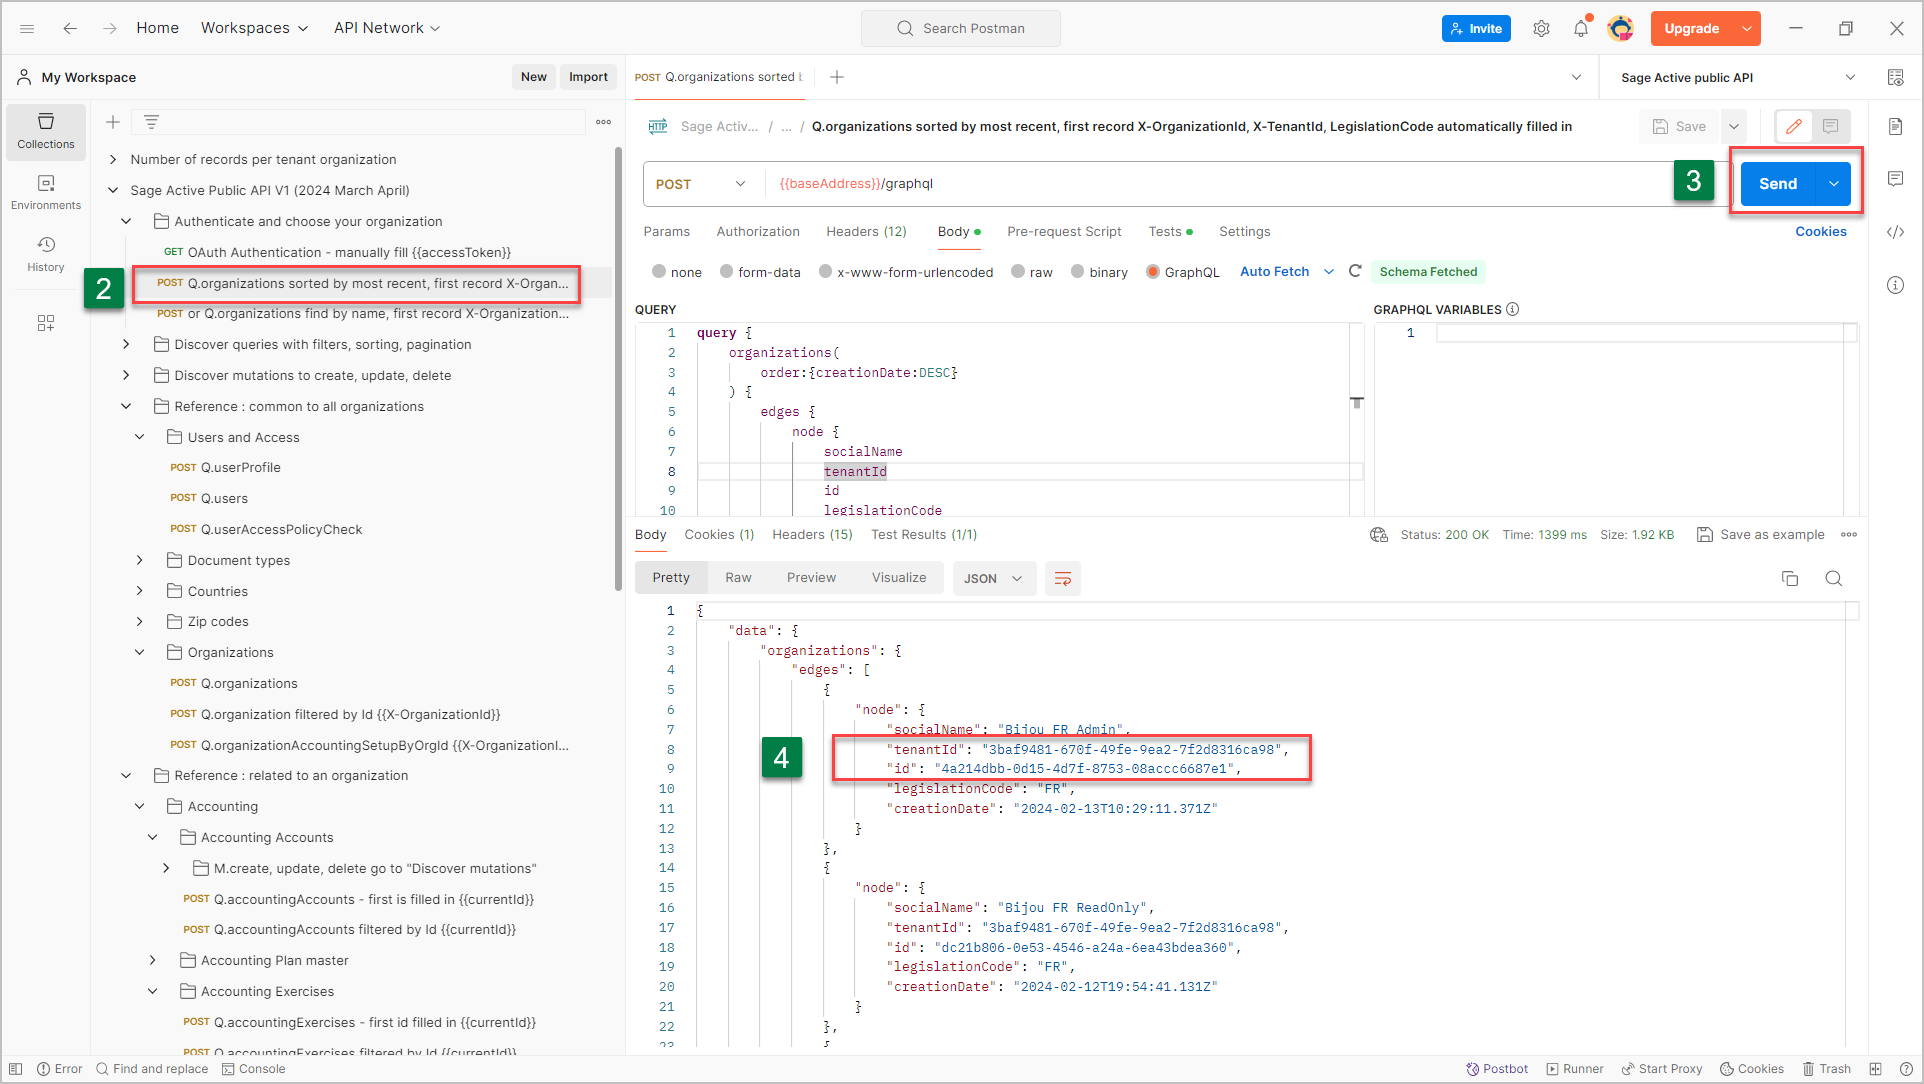
- Now click on Q.organizations sorted by most recent, first record X-OrganizationId, LegislationCode automatically filled in,
- then click Send button.
- The list of organizations authorized for the current user is returned by the API.
- To save time, a script in the Tests tab will automatically store in the environment variables:
- X-OrganizationId, the ID of this organization,
- LegislationCode, representing the organization’s legislation (this value is used within the collection context to assign consistent values according to the legislation).
This saves you from having to manually assign these values.
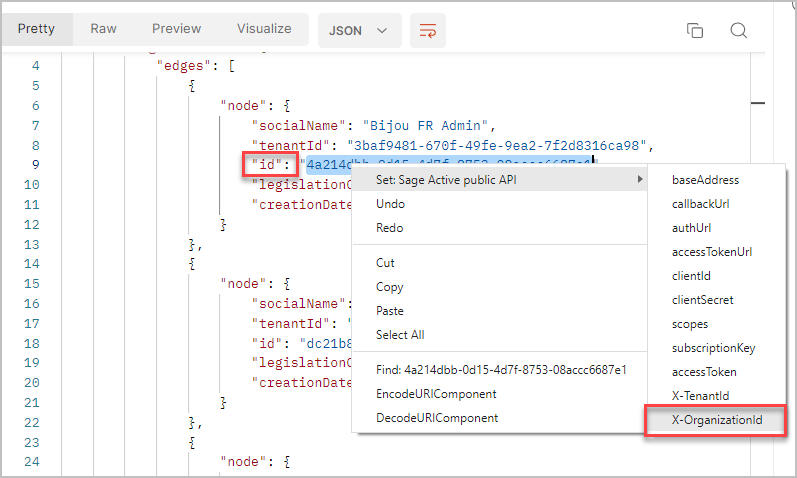
Do you want to switch to another organization and manually set the variables?
- Choose your organization,
We recommend selecting an organization that includes a dataset with demo data to assist you in utilizing this collection.
- then right click and select Set: Environment Sage Active Public API,
-
then select id to save the value in the X-OrganizationId variable.
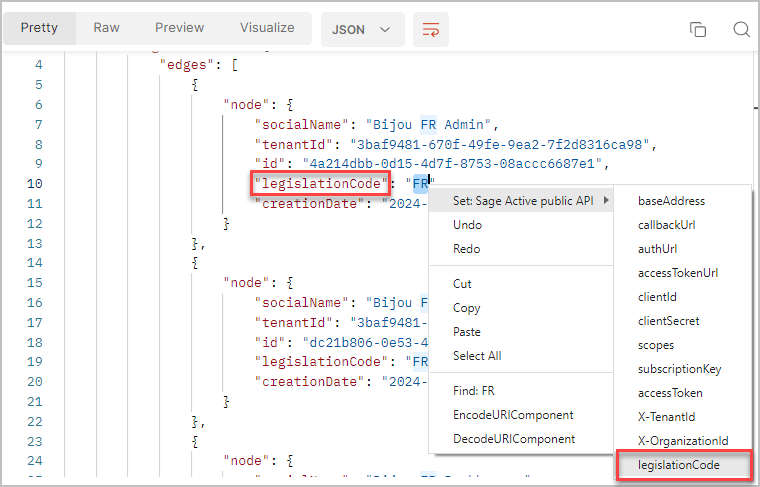
-
And finally with legislationCode for legislationCode
Can’t wait to know the syntax of the query?
Just click on Body to find out.

Request the list of journals
- First, check in the environment Sage Active Public API, if you have now a value for X-OrganizationId
Otherwise, you cannot query the list of journalTypes of the organization and you need to repeat the previous step.
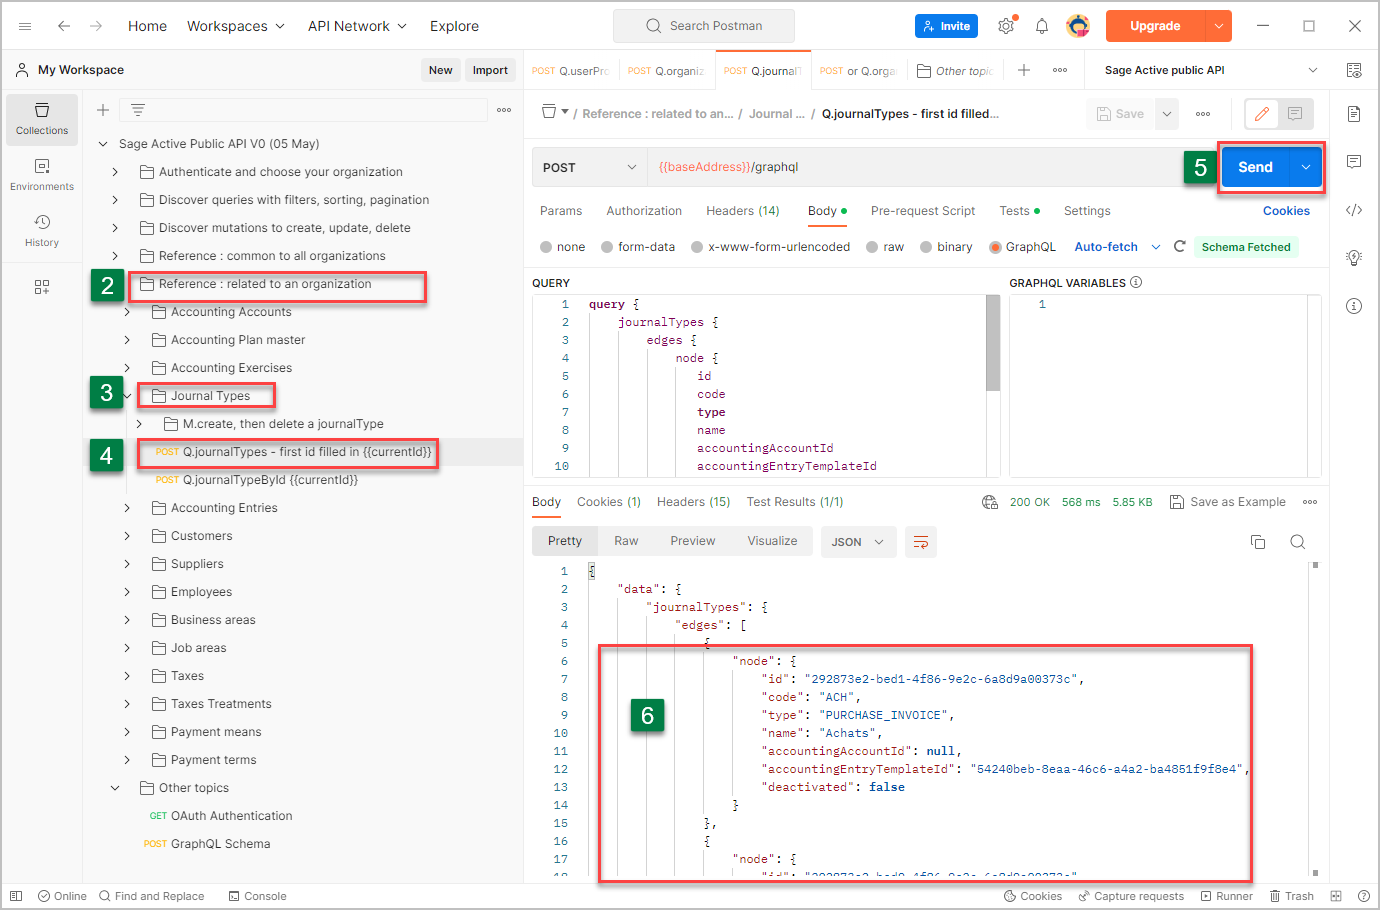
- Return in the collection and open the folder Reference : related to an organization.
- Open sub folder Journal Types.
- Click on Q.journalTypes - first id filled in {{currentId}},
- then click Send button.
- The list of journals is returned by the API.
How about adding a simple filter to our Journals query?
- Click Body tab
- As an example, to obtain only the list of journals of type purchase or sales, add a where expression :
   query {
   journalTypes (
         where:{ type:{in: [PURCHASE_INVOICE, SALES_INVOICE]}}
   ) {
         edges {

7. Recommendations
Testing Queries with an Organization Containing Demo Data Already
To maintain consistency, take account of current FR, ES, or DE legislation, and optimize data additions, we recommend you test queries wit an organization that already contains demo data.
How to import Demo Data?
Import demo data
Discover how then sample quotes app now seamlessly enables the importation of a comprehensive set of demo data into your current company, should it find the data vaults empty.
A simple, streamlined process to kickstart your experience with fully populated data!
How to import Demo Data in your organization ?
Importing a demo dataset through the Samples quotes app, provided as an API usage example, is straightforward.
Follow these steps:
- Launch the Online version of the sample quotes. Sample quotes / 2. Test the app Online
- Select the organization where you wish to import the demo data.
- If this organization does not yet contain demo date, a dialog box will appear, offering to import the demo data.
The app detects automatically if you already have demo data and automatically adjusts the import dialog box to either import all demo data or only the new data that was not available in previous versions of the import tool.
The imported data pertains to:
- Customers: A batch of customers from the legislation, customers in France, one customer per VIES country
- Suppliers: A batch of suppliers from the legislation, suppliers in France
- Employees: A list of employees with names in line with the legislation
- Products: A list of products with titles and descriptions in the language of the legislation
- Fiscal years: Two calendar years, n-1 and n
- Accounting entries: A set of accounting entries consistent with the legislation
- Sales Quotes: A list of sales quotes relevant to the demo data
- Orders: A list of orders associated with the demo organization
- Delivery Notes: A set of delivery notes related to demo orders
- Sales Invoices: A collection of sales invoices based on demo data
- In each legislation, a customer and a supplier have been chosen to assist with demonstrations; they have a larger number of accounting entries than other third parties.
- customer:
CARAT - Carat S.a.r.l - supplier:
BILLOT - Billot
- customer:
8008 - José Martínez Pérez - supplier:
1005 - Carmines Juanan
- customer:
10135 - Krause Bürotechnik GmbH - supplier:
70028 - Manderscheid Gmbh
- customer: (PT demo third party — to be confirmed)
- supplier: (PT demo third party — to be confirmed)
- customer:
- To always stay in the same context of demonstration, each month contains the same accounting entries, so no matter the day of the demonstration, the journal entries will always present the same information.
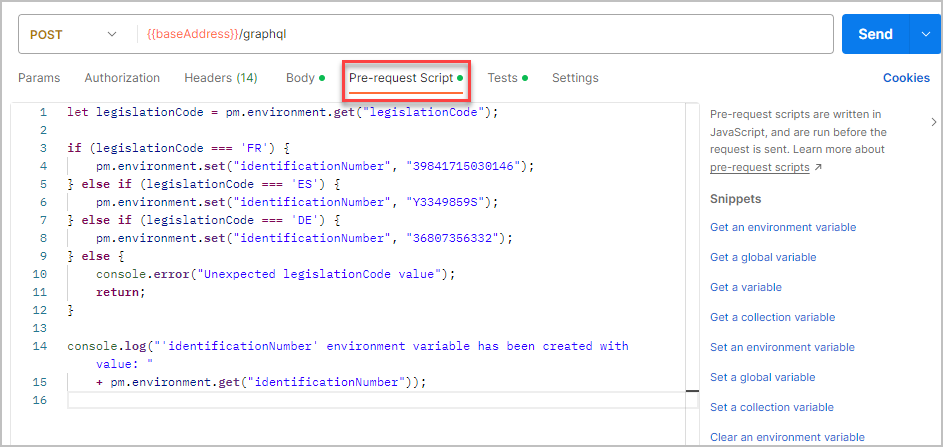
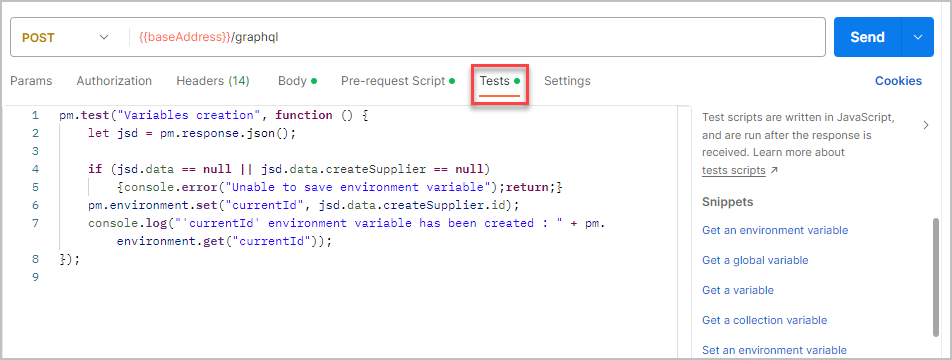
Pre-request Script and Test tabs
Please also note that certain values are defined in the Pre-request Script and Test tabs.
The green light indicates whether scripting has been defined:
The green light indicates whether scripting has been defined:
8. Well done !
You have just executed your first requests to Sage Active Public API V2.
Now continue to discover the collection :
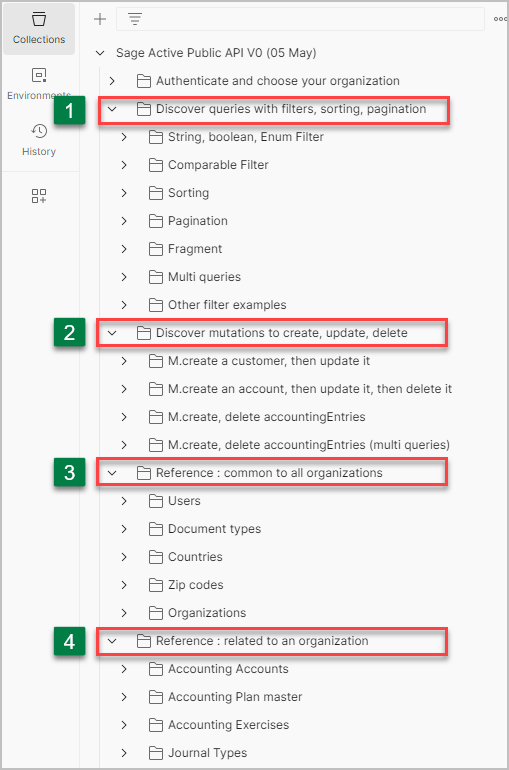
- Discover queries with filters, sorting and pagination.
- Discover mutations to create, update, delete.
- Reference of all objects common to all organizations with all available queries and mutations.
- Reference of all objects related to an organization with all available queries and mutations.
Then you will be able to start developing your first application.