Create a new screen (Sage 200 Professional only)
Less than to read
Welcome to the comprehensive guide on adding a new screen to Sage 200 Professional. In this tutorial, we will walk you through the step-by-step process of adding a custom screen to your Sage 200 Professional software. Please note that this feature is exclusive to Sage 200 Professional and is not available in Sage 200 Standard. By the end of this guide, you will have a clear understanding of how to create a new screen and integrate it seamlessly into the Sage 200 Professional interface.
Methods for creating a new web screen
Before we begin, it’s important to understand the two methods available for creating a new screen:
-
Sage 200 Addon Packager: This method requires the Sage 200 Addon Packager (SDBX file) and access to the Sage 200 SDK via a subscription to the Sage Developer Programme. It allows for easy deployment across multiple client sites.
-
Single Site Deployment: This method, which we’ll be following in this guide, can be done with access to Sage 200 Professional. However, if you plan to deploy your addon to multiple sites, note that this method needs to be performed individually for each site, which can be time-consuming. It is the ideal approach for a single-site addon.
Single Site Deployment
The process of adding a new screen can be broken down into three steps: creating a target feature, adding a screen to the menu, and adding a schema to the web portal.
Part 1: Create Feature Target
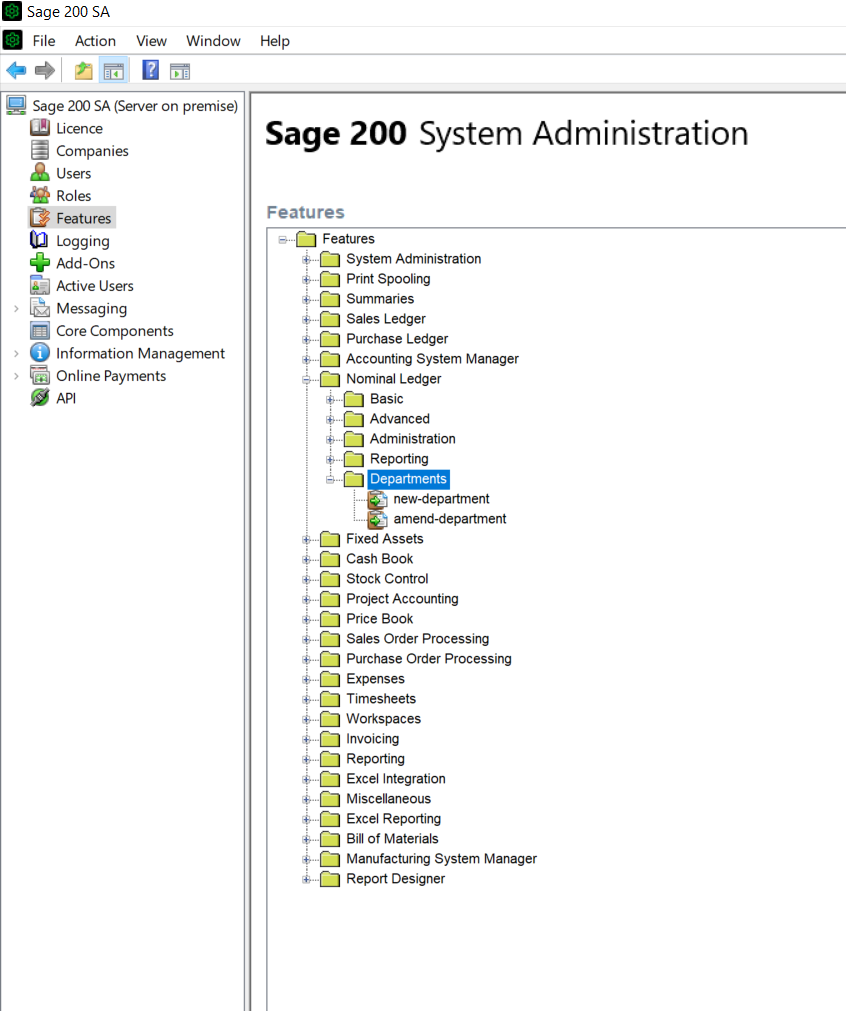
To begin we will need to create the feature targets within System Administration:
-
Open Sage 200 System Administration
-
Navigate to the “Features” section in the left-hand menu.
-
In the right-hand menu, locate the “Nominal Ledger” group and right-click on it.
-
Select “Add New Group” and name it “Departments” (or choose an appropriate name for your new group). This will create a new folder called “Departments” within the Nominal Ledger group.
-
Right-click on the newly created “Departments” folder and select “Add New Feature”.
-
In the dialog box that appears, enter the name “new-department” for the first feature. You can leave the GUID as it is, and click “OK”.
-
Repeat steps 5 and 6, naming the second feature “amend-department”.
At this point, you should have a new group called “Departments” in the “Nominal Ledger” group with two features: “new-department” and “amend-department”.
-
Select the “new-department” feature and go to the “Feature Properties” section at the bottom of the page.
-
Click on the “Targets” tab and click “Add…” on the right-hand side.
- In the dialog box, provide a “Target Name” and a “Target Web URL” as follows:
Target Name: Use a descriptive name to identify the target feature. New DepartmentTarget Web URL: Specify the URL that our schema will target later. extensions/new-department
-
Repeat steps 8-10 for the “amend-department” feature, setting its name to Amend Department and its target URL to extensions/amend-department.
-
Enable Role Authorization by right-clicking on the “Departments” group folder and selecting “Role Authorization-Enable Group”.
-
Select the roles for which you want to enable the group by transferring them from the available roles to the enabled roles.
- Click “OK” to save the changes.
Part 2: Add Page to the Menu
Now, let’s create a “New Menu Item” for our web screen. In this guide, we’ll create a new folder within Nominal Ledger and add two menu items for the “new-departments” and “amend-departments” features.
-
Open your Sage 200 Professional desktop.
-
Locate the menu on the left-hand side. Click the pencil icon at the top to enable menu editing. You will only be able to customise the menu if your account has permission, which is set using “Can Edit Menu” in your user properties in System Administration.
-
To create the new folder, right-click on the Nominal Ledger and choose “New Folder.” Name the folder “Departments.”
-
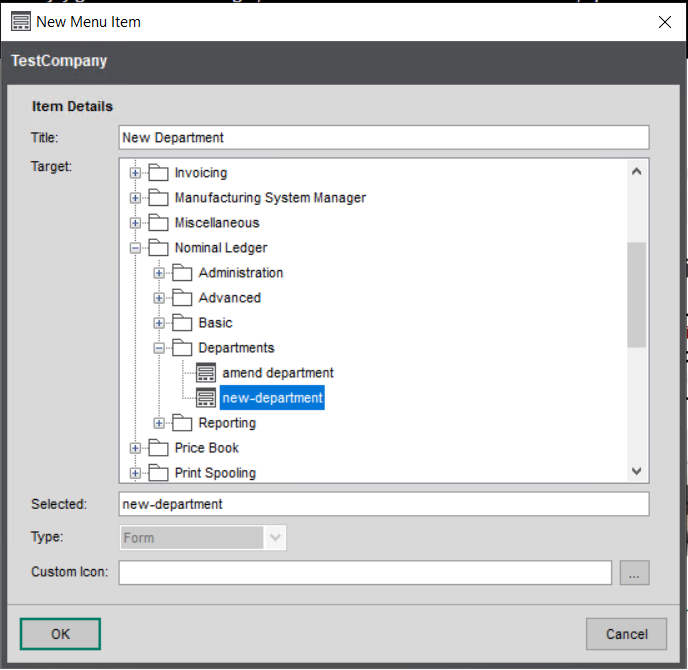
Next, right-click on the newly created “Departments” folder and select “New Menu Item.” You should see a dialog box like this:
-
Give the menu item a descriptive “Title” such as “New Department”.
-
Now, choose a “Target” within the Nominal Ledger folder. We’ll select our new feature new-department for this example.
-
Repeat steps 4-6 to add another menu item for the amend-departments feature. Set its “Title” to Amend Departments and the “Target” as amend-departments within the Departments folder.
-
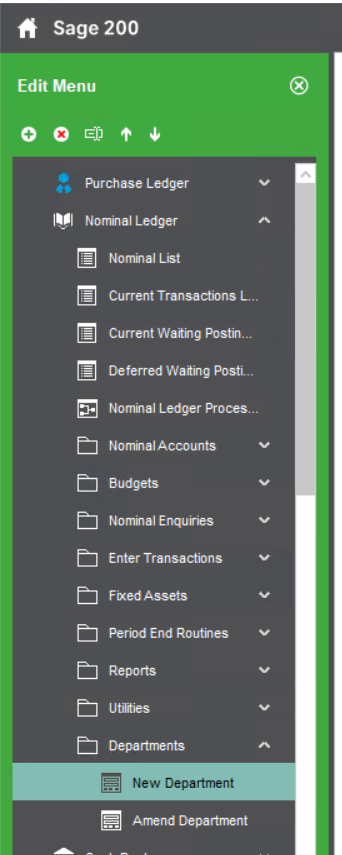
Exit the edit mode to save your changes, your menu should look similar to this:
Part 3: Add Schema to Web Portal
In this step, we will configure Sage 200 Professional to include a schema file in the Web Portal. The key focus now is on the “pages” section of the schema, where we need to ensure that the “pages” match the Target URLs of our desired features. In our case, these are “extensions/new-department” and “extensions/amend-department”.
Below is a schema to provide a working example but for a comprehensive guide to this schema file, please refer to the Example deptScreens.
-
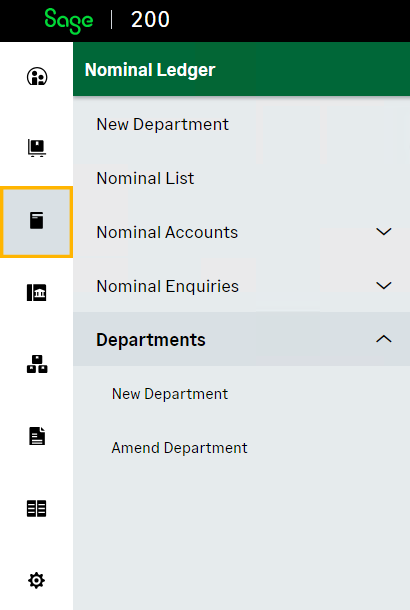
In Sage 200 Web Portal, let’s verify that our new menu items are visible.
-
From the left-hand menu, select “Nominal Ledger”. You should see our two new menu items, namely “New Department” and “Amend Department” in the Departments folder. Clicking on these items at this point will display a blank screen, so we need to add some components.
-
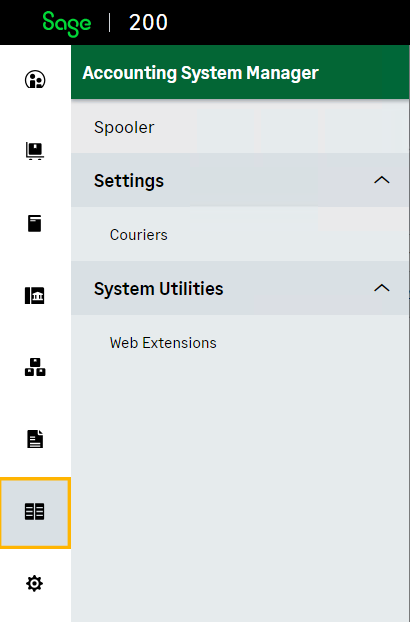
Open Accounting System Manager > System Utilities > Web Extensions. This will take you to the web extensions editor.
-
To add your web extension, click on the “Add” button. Next, copy and paste the complete “New/Amend Departments Full Schema Example” json in the link below into the script editor.
New/Amend Departments Full Schema Example
 {
   "version": "1.0",
   "pages": [
     "extensions/new-department",
     "extensions/amend-department"
   ],
   "uiExtensions": [
     {
       "id": "NewDeptExt",
       "component": [
         {
           "Textbox": {
             "id": "code",
             "label": "Code"
           }
         },
         {
           "Textbox": {
             "id": "name",
             "label": "Name"
           }
         },
         {
           "Textbox": {
             "id": "contact_name",
             "label": "Contact name"
           }
         },
         {
           "Textbox": {
             "id": "contact_details",
             "label": "Contact details"
           }
         }
       ]
     },
     {
       "id": "AmendDeptExt",
       "component": [
         {
           "BaseSelect": {
             "id": "dept_id",
             "label": "Department",
             "isClientSide": false,
             "confirmFormDirty": true,
             "endpoint": "v1/departments",
             "keyFields": [ "code", "id" ],
             "columns": [
               {
                 "field": "code",
                 "headerName": "Code"
               },
               {
                 "field": "name",
                 "headerName": "Name"
               }
             ]
           }
         },
         {
           "Textbox": {
             "id": "code",
             "label": "Code"
           }
         },
         {
           "Textbox": {
             "id": "name",
             "label": "Name"
           }
         },
         {
           "Textbox": {
             "id": "contact_name",
             "label": "Contact name"
           }
         },
         {
           "Textbox": {
             "id": "contact_details",
             "label": "Contact details"
           }
         }
       ]
     }
   ],
   "actions": {
     "deptLoad": [
       {
         "apiGetMetadata": {
           "endpoint": "v1/departments",
           "prefix": ""
         }
       }
     ],
     "deptClear": [
       {
         "resetState": {}
       }
     ],
     "deptPut": [
       {
         "tryCatch": {
           "try": [
             {
               "apiPut": {
                 "endpoint": "v1/departments",
                 "prefix": "",
                 "id": {
                   "get": {
                     "state": "dept_id"
                   }
                 }
               }
             },
             {
               "resetState": {}
             }
           ],
           "catch": [
             {
               "set": {
                 "state": {
                   "catch": {
                     "string": {
                       "value": "myCatch"
                     }
                   },
                   "error_message": {
                     "string": {
                       "value": "PUT failed"
                     }
                   }

                 }
               }
             }
           ]
         }
       }
     ],
     "deptPost": [
       {
         "tryCatch": {
           "try": [
             {
               "apiPost": {
                 "endpoint": "v1/departments",
                 "prefix": ""
               }
             },
             {
               "set": {
                 "success_message": "Department updated successfully"
               }
             },
             {
               "resetState": {}
             }
           ],
           "catch": [
           {
             "set": {
               "error_message": {
                 "title": "Error updating Department",
                 "message": {
                     "get": {
                     "state": "CURRENT_ERROR"
                     }
                   }
                 }
               }
             }
           ],
           "finally": [
             {
               "set": {
                 "state": {
                   "finally": {
                     "string": {
                       "value": "myFinally"
                     }
                   }
                 }
               }
             }
           ]
         }
       }
     ]
   },
   "validations": [],
   "events": [
     {
       "pages": [
         "extensions/new-department"
       ],
       "onSubmit": [{
         "action": "deptPost"
       }],
       "onClear": [{
         "resetState": {}
       }],
       "onLoad": [
         {
           "apiGetMetadata": {
             "endpoint": "v1/departments",
             "prefix": ""
           }
         },
         {
           "set": {
             "pageExtension": {
               "componentId": "ExtensionMainPod",
               "panel": "bottom",
               "uiExtension": "NewDeptExt"
             }
           }
         }
       ]
     },
     {
       "pages": [
         "extensions/amend-department"
       ],
       "onStateChange": [{
         "watchTarget": "dept_id",
         "onChange": [
           {
             "if": {
               "ne": [
                 {
                   "get": {
                     "state": "dept_id"
                   }
                 },
                 {
                   "string": {
                     "value": ""
                   }
                 }
               ],
               "then": [
                 {
                   "apiGet": {
                     "endpoint": "v1/departments",
                     "prefix": "",
                     "id": {
                       "get": {
                         "state": "dept_id"
                       }
                     },
                     "queryParams": {
                       "$expandall": "true"
                     }
                   }
                 }
               ]
             }
           }
         ]
       }],
       "onSubmit": [{
         "action": "deptPut"
       }],
       "onClear": [{
         "resetState": {}
       }],
       "onLoad": [
         {
           "apiGetMetadata": {
             "endpoint": "v1/departments",
             "prefix": ""
           }
         },
         {
           "set": {
             "pageExtension": {
               "componentId": "ExtensionMainPod",
               "panel": "bottom",
               "uiExtension": "AmendDeptExt"
             }
           }
         }
       ]
     }
   ]
 }
As mentioned earlier, the “pages” section in this schema is crucial as it needs to match the Target URLs from your feature Targets.
"pages": [ "extensions/new-department", "extensions/amend-department" ], -
Provide a meaningful “Name” for this schema and click “Save”.
-
Now, when you navigate to the Nominal Ledger menu item and select either “New Department” or “Amend Department”, you will see the components displayed.
Congratulations! You have successfully completed the process of adding a new screen to Sage 200 Professional. By following the detailed steps outlined in this guide, you have gained the ability to create custom screens tailored to your specific business needs. Whether you choose the Sage 200 Addon Packager or the Single Site Deployment method, you now have the power to enhance your Sage 200 Professional experience by adding new features and functionalities. We hope this guide has been helpful in expanding your understanding of Sage 200 Professional’s capabilities. Feel free to explore further and unlock the full potential of your Sage 200 Professional software.